Google Consent Mode V2 Free Setup Guide in 2025
Balancing user privacy and effective advertising in regions like Europe is crucial. Google Consent Mode V2 provides a solution ensuring you respect user privacy while maintaining ad performance measurement and personalized advertising capabilities.
Google initiated audits of advertisers in April 2024 and now mandates the implementation of Consent Mode if tracking is active on your website.
This requirement is particularly important if you operate and gather user data within the European Economic Area (EEA).
Advertisers who fail the audit will face enforcement actions, such as disabling conversion tracking. Google can even suspend your use of their products.
You must obtain legally valid user consent for:
-
Cookie or local storage use.
-
Collecting, sharing, and using personal data for ad personalization.
This comprehensive guide will provide you with a step-by-step walkthrough of the technical setup process for Google Consent Mode V2 on your website, all using freely available tools.
You are not strictly forced to implement Consent Mode V2 if you already have a cookie banner.
Google Consent Mode V2 is not a replacement for your existing cookie consent banner. It is an enhancement, working alongside your cookie banner or Consent Management Platform (CMP).
To fully leverage Google Ads features such as remarketing and personalized targeting, implementing Consent Mode V2 is strongly advised.
It allows Google to gather anonymized data even when users don't fully consent to tracking, helping you bridge the gap between privacy and data-driven marketing.
Consent Mode V2 isn't about replacing your cookie banner, but rather optimizing your data collection and ad performance within the boundaries of user consent.
Previously, Google Analytics or Google Ads tag scripts were loaded only after a user gave specific consent on your site (e.g., by checking the "Analytics" or "Marketing" boxes).
With Google Consent Mode V2, tags are now loaded before the user makes a choice. However, if the visitor doesn't grant permission, Google tags will only collect anonymous data, consent-free data — which is allowed under regulations like the GDPR, as long as no personally identifiable information is processed.
Important:
This behavior applies only to Google products. Other tags, like Meta Pixel (Facebook pixel), must still be loaded after the user gives the appropriate consent.
To take full advantage of Google Consent Mode V2, your site needs to send detailed signals about each consent choice your users make.
In this guide, we’ll use the following free tools:
-
Cookie Consent Plugin: an open-source tool by Orest Bida that displays a cookie banner where users can manage their consent preferences.
-
Google Tag Manager (GTM): used to manage and control tags such as Google Analytics, Google Ads, and other tags like the Meta Pixel, etc.
We'll walk through how to connect the cookie banner with GTM, so your tags fire based on the specific consent choices users make.
To follow this Google Consent Mode V2 setup guide, please make sure you have the following ready:
-
Google Tag Manager (GTM) Account: you'll need an active Google Tag Manager account. If you don't have one yet, you can create one for free at tagmanager.google.com.
-
Access to Your Website's Code: you'll need the ability to add code to your website, specifically the Google Tag Manager container snippet. This usually involves access to your website's HTML or your website platform's settings.
-
Optional: Google Analytics 4 and/or Google Ads Accounts: you'll likely want to use it to enhance your data collection and advertising effectiveness with Google Analytics 4 (GA4) and Google Ads. Having these accounts ready will allow you to immediately see the benefits of Consent Mode V2 in action.
-
Familiarity with Google Tag Manager (Basic): this guide assumes you have a basic understanding of how Google Tag Manager works.
Once you have these prerequisites in place, you'll be ready to follow the step-by-step instructions and implement Google Consent Mode V2 on your website!
First, we need to display a cookie consent banner so that visitors can select and manage their consent preferences.
We'll add the banner using a "Custom HTML tag" in Google Tag Manager (GTM). This method is clean and flexible — and it’s the one we recommend. However, you’re not limited to GTM. If you prefer, you can also embed the HTML code directly into your site.
Go to Google Tag Manager and select your container.
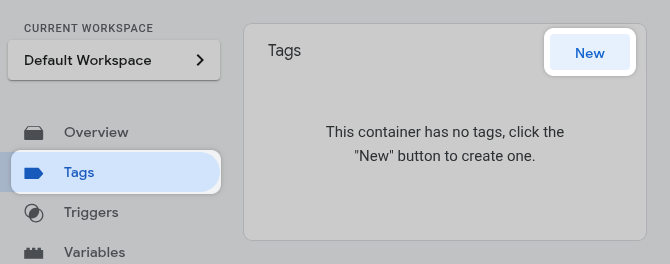
Click "Tags" in the left-hand menu.
Then click "New" in the top-right corner to create a new tag.
Click on the "Tag Configuration" box.
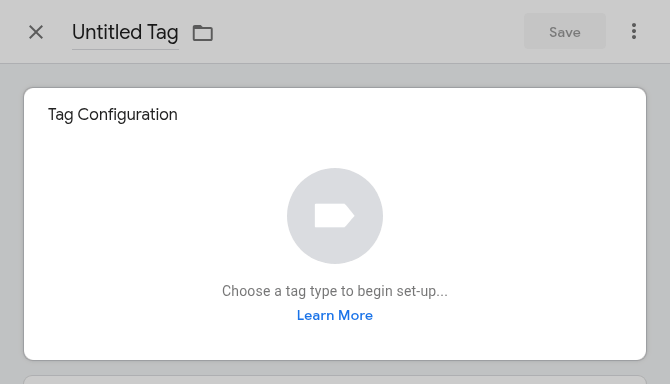
From the list of tag types, choose "Custom HTML".

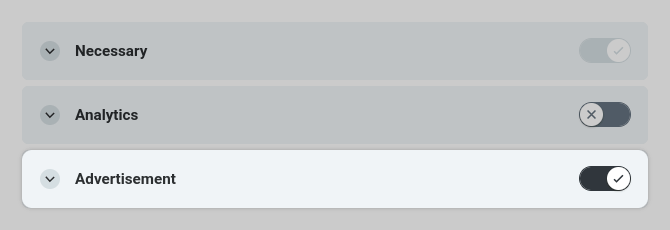
The image below illustrates a typical consent banner UI with categories.
The example below features three common consent types:
-
Necessary: essential for site function.
-
Analytics: for tracking website usage.
-
Advertisement: for personalized ads and remarketing.
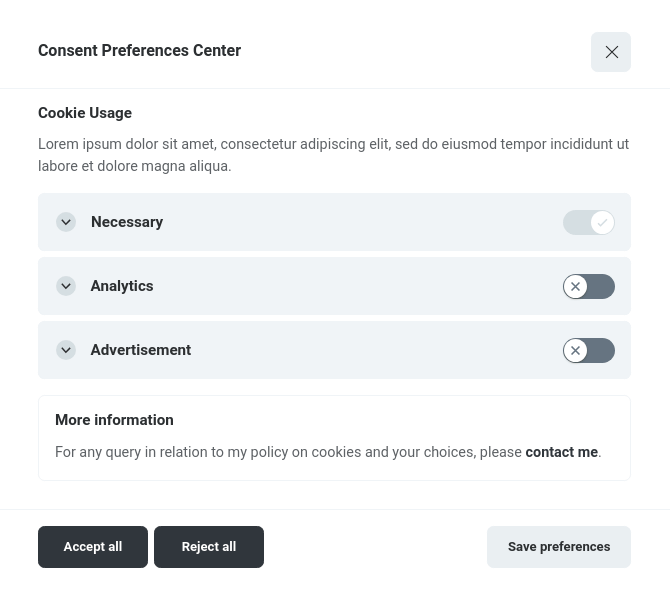
Now, let's transform this visual into functional code. We're going to build the mechanism that actually displays the banner, collects user consent, and communicates it correctly for Google Consent Mode V2.
Below, you'll find the necessary HTML (for structure), CSS (for styling), and JavaScript (for functionality). We will go through it section by section.
Crucial Step:
You need to copy all the following code snippets, in the order presented, and paste them together into the same Custom HTML tag within your Google Tag Manager container.
Let's break down the code.
First, we need to pull in the core resources for the consent banner itself. We're using a specific open source cookie consent plugin, which handles much of the complex banner logic for us.
Action:
Add the following tags at the very beginning of the HTML text box in your Custom HTML tag:
<link rel="stylesheet" href="https://cdn.jsdelivr.net/gh/orestbida/[email protected]/dist/cookieconsent.css">
<script src="https://cdn.jsdelivr.net/gh/orestbida/[email protected]/dist/cookieconsent.umd.js"></script>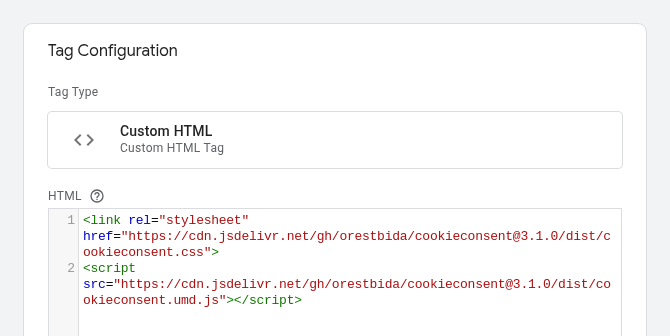
Now we get to the core logic. We need to define the consent categories that users will see (like "Analytics" and "Advertising").
In this example, we'll configure three categories:
-
necessary: for essential functions. These will be enabled by default and cannot be disabled by the user (readOnly: true). -
analytics: for website measurement. -
ads: for advertising-related tracking and personalization.
You are not limited to these specific categories. Feel free to customize, add, or remove categories based on the types of tracking and cookies your website uses.
Connecting Categories to Google's Parameters:
You'll define your consent structure and establish the link between user choices and the signals Google requires via Consent Mode V2.
The key is within the onAccept and onReject functions for each category. Later we will add a logic, so when a user accepts or rejects a category, these functions will trigger an update to Google's specific consent parameters using the gtag('consent', 'update', consentData) command. This is the essential step for Google Consent Mode V2 compliance.
Categories and consent mapping
Here's how the categories in our example map to the Google Consent Mode settings:
-
The Necessary category implicitly grants
functionality_storageandsecurity_storageas it's always accepted. -
Accepting Analytics grants
analytics_storage. -
Accepting Ads grants
ad_storage,ad_user_data, andad_personalization. -
Rejecting these categories denies the corresponding storage parameters.
Action:
Add the following JavaScript code block immediately after the <link> and <script> tags you added in the previous step, within the same Custom HTML tag.
<script>
  var consentCategories = {
    necessary: {
      enabled: true,
      readOnly: true,
      // On accept we grand consent for "functionality_storage"
      // and "security_storage".
      onAccept: function() {
        var consentData = {
          functionality_storage: 'granted',
          security_storage: 'granted',
        };

        updateConsentData(consentData, 'consent_accepted_necessary');
      }
    },

    analytics: {
      // On accept we grand consent for "analytics_storage".
      onAccept: function() {
        var consentData = {
          analytics_storage: 'granted',
        };

        updateConsentData(consentData, 'consent_accepted_analytics');
      },
      // On reject we deny conset for "analytics_storage".
      onReject: function() {
        var consentData = {
          analytics_storage: 'denied',
        };

        updateConsentData(consentData);
      }
    },

    ads: {
      // On accept we grand consent for "ad_storage",
      // "ad_user_data" and "ad_personalization".
      onAccept: function() {
        var consentData = {
          ad_storage: 'granted',
          ad_user_data: 'granted',
          ad_personalization: 'granted',
        };

        updateConsentData(consentData, 'consent_accepted_advertising');
      },
      // On reject we deny consent for "ad_storage",
      // "ad_user_data" and "ad_personalization".
      onReject: function() {
        var consentData = {
          ad_storage: 'denied',
          ad_user_data: 'denied',
          ad_personalization: 'denied',
        };

        updateConsentData(consentData);
      },
      // Also we clear the coocies for specific tags.
      // In this example, we delete cookies associated
      // with Facebook Pixel.
      autoClear: {
        cookies: [
          {name: /^_fb/},
          {name: 'fr'},
          {name: 'tr'},
        ]
      },
    },
  };

  function updateConsentData(consentData, eventName) {
    CookieConsent.setCookieData({
      value: consentData,
      mode: 'update'
    });

    gtag('consent', 'update', consentData);

    if (eventName) {
      dataLayer.push({'event': eventName});
    }
  }
</script>Next, we need to define the actual text that will appear on your consent banner and within the preferences modal (the detailed view). This includes titles, descriptions, button labels, and information about each consent category.
With the plugin we're using you can set multiple languages. This allows to present the banner appropriately to users based on their browser or site language settings. You can find detailed instructions for advanced multi-language setups in the official documentation.
Decide if you want to include the optional (but recommended) cookieTable for each category and populate it accurately if you do.
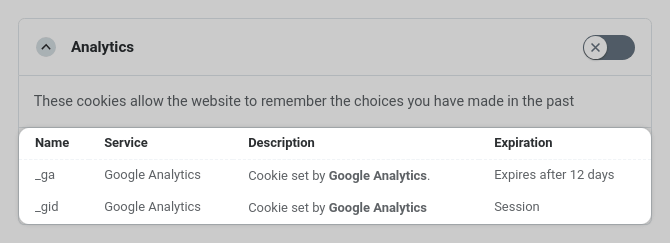
Review and replace all placeholder text (titles, descriptions, cookie details, links) with content specific to your website and privacy practices.
The linkedCategory values are essential for connecting the UI to the consent logic.
For simplicity in this guide, we will configure the text for English only.
Action:
Add the following JavaScript code block immediately after the consentCategories script block you added in the previous step (still within the same Custom HTML tag).
<script>
  var consentLanguages = {
    en: {
      "consentModal": {
          "title": "Consent Modal Title",
          "description": "Consent Modal Description",
          "acceptAllBtn": "Accept all",
          "acceptNecessaryBtn": "Reject all",
          "showPreferencesBtn": "Manage preferences"
      },
      "preferencesModal": {
        "title": "Cookie preferences",
        "acceptAllBtn": "Accept all",
        "acceptNecessaryBtn": "Reject all",
        "savePreferencesBtn": "Save preferences",
        "closeIconLabel": "Close",
        "sections": [
          {
            "title": "Cookie usage",
            "description": "We use cookies to ensure the basic functionalities of the website and to enhance your online experience ..."
          },
          {
            "title": "Necessary",
            "description": "These cookies are essential for the proper functioning of my website. Without these cookies, the website would not work properly",
            "linkedCategory": "necessary"
          },
          {
            "title": "Analytics",
            "description": "These cookies allow the website to remember the choices you have made in the past",
            "linkedCategory": "analytics",
            "cookieTable": {
              "headers": {
                "name": "Name",
                "domain": "Service",
                "description": "Description",
                "expiration": "Expiration"
              },
              "body": [
                {
                  "name": "_ga",
                  "domain": "Google Analytics",
                  "description": "Cookie set by <a href=\"#das\">Google Analytics</a>.",
                  "expiration": "Expires after 12 days"
                },
                {
                  "name": "_gid",
                  "domain": "Google Analytics",
                  "description": "Cookie set by <a href=\"#das\">Google Analytics</a>",
                  "expiration": "Session"
                }
              ]
            }
          },
          {
            "title": "Advertisement",
            "description": "These cookies allow the website to remember the choices you have made in the past",
            "linkedCategory": "ads"
          },
          {
            "title": "More information",
            "description": "For any queries in relation to our policy on cookies and your choices, please <a class=\"cc-link\" href=\"#yourdomain.com\">contact us</a>."
          }
        ]
      }
    }
  }
</script>This final script block is the engine that starts the CookieConsent plugin. It pulls together all the configurations we've defined in the previous steps – the categories, the language settings, and the consent update logic – and uses them to display and manage the banner.
Key functions of this script:
-
Initialization: it calls
CookieConsent.run({...})to activate the banner. -
Links configurations: it references the
consentCategoriesandconsentLanguagesvariables you created earlier. -
Sets banner appearance: the
guiOptionsobject controls the visual layout and positioning of the main banner (consentModal) and the preferences center (preferencesModal). You can customizelayout(e.g.,box,cloud,bar),position(e.g.,bottom left,top center), and button styles. -
Stores consent: the
cookieobject defines how the user's consent choices are stored (cookie namecc_cookie, usinglocalStoragein this case for persistence). -
Handles user actions: this is the crucial part for Consent Mode V2 integration.
-
onFirstConsent: This function runs only the first time a user interacts with the banner (e.g., clicks "Accept All", "Reject All", or saves preferences). It checks which categories were accepted and executes the correspondingonAcceptfunction you defined withinconsentCategoriesin Define and Configure Consent Categories section. -
onChange: This function runs every time a user changes their preferences after the initial choice (e.g., they reopen the preferences modal, toggle a category, and click "Save"). It specifically checks the categories that changed and executes the appropriateonAcceptoronRejectfunction for each changed category (again, using the functions defined in the configuration section).
-
Action:
Add this final JavaScript block immediately after the consentLanguages script block (still within the same Custom HTML tag).
<script>
  CookieConsent.run({
    cookie: {
      name: 'cc_cookie',
      useLocalStorage: true,
    },

    guiOptions: {
      consentModal: {
        layout: "box",
        position: "bottom left",
        equalWeightButtons: true,
        flipButtons: false
      },
      preferencesModal: {
        layout: "box",
        position: "right",
        equalWeightButtons: true,
        flipButtons: false
      }
    },

    onFirstConsent: function(data) {
      var categories = CookieConsent.getConfig('categories');

      for (var i = 0; i < data.cookie.categories.length; i++) {
        var category = data.cookie.categories[i];

        if (CookieConsent.acceptedCategory(category)) {
          categories[category].onAccept();
        }
      }
    },

    onChange: function(data) {
      var categories = CookieConsent.getConfig('categories');

      for (var i = 0; i < data.changedCategories.length; i++) {
        var category = data.changedCategories[i];

        if (CookieConsent.acceptedCategory(category)) {
          categories[category].onAccept();
        } else {
          categories[category].onReject();
        }
      }
    },

    categories: consentCategories,
    language: {
      default: "en",
      autoDetect: "browser",
      translations: consentLanguages
    }
  });
</script>
With this final script in place, your consent banner should now be fully configured to load, display text, collect user consent, and communicate those choices correctly for Google Consent Mode V2 compliance via the gtag('consent', 'update', consentData) calls triggered by user actions.
You've now assembled all the code needed for your consent banner within the Custom HTML tag. The final step in GTM is to tell this tag when it should run.
Google Tag Manager has special trigger types designed for managing consent. The "Consent Initialization - All Pages" trigger is specifically engineered to fire before any other tags (except those also using Consent Initialization).
Using this trigger ensures:
-
Your consent banner code loads immediately on every page.
-
It can establish the initial default consent settings very early in the page load process.
-
It runs before other tags (like Google Analytics, Google Ads, Meta Pixel) that depend on the consent status, preventing them from firing incorrectly before consent is known or granted.
In your Custom HTML tag configuration screen, scroll down to the "Triggering" section and click anywhere within the box.
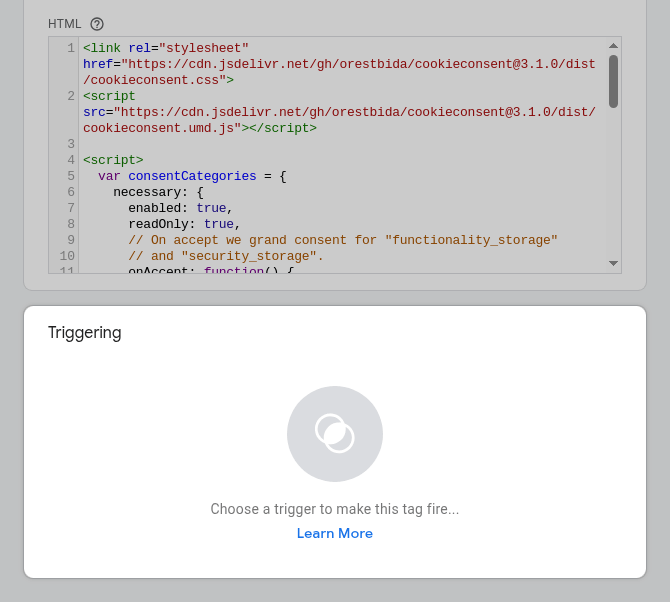
From the list, select "Consent Initialization - All Pages".

Name and save your tag.

Your Custom HTML tag containing the consent banner logic is now configured and set to run at the correct time on all pages. The next steps involve configuring Google's default consent state and testing the implementation.
This is arguably the most important technical requirement for Google Consent Mode V2.
Before any Google tags (Analytics, Ads, etc.) are allowed to load or process data, you MUST explicitly set a default consent state for all relevant parameters.
Typically, this means setting non-essential categories like analytics_storage and ad_storage to 'denied' by default, while respecting any consent the user might have already given on a previous visit.
To achieve this, we'll create a new, dedicated Custom HTML tag in Google Tag Manager. This tag will run extremely early on every page load.
Action: Create a New Custom HTML Tag.
-
Go back to your GTM container overview.
-
Click "Tags" > "New".
-
Click "Tag Configuration" and choose "Custom HTML".
-
Give the tag a clear name, such as "[HTML] - Set Default Consent State".
-
Paste the below code into the HTML box.
-
Select the "Consent Initialization - All Pages" trigger.
<script>
  window.dataLayer = window.dataLayer || [];
  function gtag() { window.dataLayer.push(arguments) }

  var cookieData = JSON.parse(localStorage.getItem('cc_cookie')) || {};

  consentData = cookieData.data || {};

  var defaultConsent = {
    analytics_storage: consentData['analytics_storage'] || 'denied',
    ad_storage: consentData['ad_storage'] || 'denied',
    ad_user_data: consentData['ad_user_data'] || 'denied',
    ad_personalization: consentData['ad_personalization'] || 'denied',
    functionality_storage: consentData['functionality_storage'] || 'denied',
    security_storage: consentData['security_storage'] || 'denied',
  };

  gtag('consent', 'default', defaultConsent);

  dataLayer.push({'event': 'consent_init'});
</script>
This code does two main things:
-
It checks if the user has previously given consent (by looking for the cookie
'cc_cookie'stored by our banner script inlocalStorage). -
It sets the Google Consent Mode defaults using
gtag('consent', 'default', defaultConsent), using the stored values if found, otherwise defaulting to'denied'.
Important Considerations for the Code:
Make sure the name 'cc_cookie' matches the cookie.name you configured in the banner initialization script.
You've now successfully configured the core functionality of your consent banner, including category definitions, language settings, and the crucial integration with Google Consent Mode V2 default and update commands.
The default appearance provided by the plugin is clean and functional, but you might want to adjust it further to perfectly match your website's branding and design.
For detailed instructions and examples on how to modify the banner's look and feel, please refer to the official documentation page on UI customization:
Customizing the UI (official documentation).
Once a user interacts with the consent banner (accepts, rejects, or saves preferences), it typically won't show again on subsequent visits. However, privacy regulations like GDPR require that users must be able to easily change their consent preferences at any time.
The cookie banner plugin makes this easy. Any HTML element (like a button or a link) with the attribute data-cc="show-preferencesModal" will act as a trigger to open the preferences modal when clicked.
You could simply add a link in your website's footer:
<a href="#" data-cc="show-preferencesModal">Cookie Settings</a>Example: Adding a Fixed Settings Icon
A common and user-friendly approach is to add a small, fixed icon (often a gear or cookie shape) in a corner of the screen that's always visible after the initial consent interaction.
To implement this fixed icon button, add the following code block containing CSS, HTML, and JavaScript to the end of the same Custom HTML tag where you initialized the main banner script.
<style>
  #preferencesModalButton {
    position: fixed;
    bottom: 10px;
    left: 10px;
    z-index: 999;
    justify-content: center;
    align-items: center;
    width: 50px;
    height: 50px;
    border-radius: 50%;
    padding: 0px;
    border: none;
    background-color: #614df7;
    background-image: url('data:image/svg+xml,<svg xmlns="http://www.w3.org/2000/svg" viewBox="0 0 24 24" fill="white"><path fill-rule="evenodd" d="M11.828 2.25c-.916 0-1.699.663-1.85 1.567l-.091.549a.798.798 0 0 1-.517.608 7.45 7.45 0 0 0-.478.198.798.798 0 0 1-.796-.064l-.453-.324a1.875 1.875 0 0 0-2.416.2l-.243.243a1.875 1.875 0 0 0-.2 2.416l.324.453a.798.798 0 0 1 .064.796 7.448 7.448 0 0 0-.198.478.798.798 0 0 1-.608.517l-.55.092a1.875 1.875 0 0 0-1.566 1.849v.344c0 .916.663 1.699 1.567 1.85l.549.091c.281.047.508.25.608.517.06.162.127.321.198.478a.798.798 0 0 1-.064.796l-.324.453a1.875 1.875 0 0 0 .2 2.416l.243.243c.648.648 1.67.733 2.416.2l.453-.324a.798.798 0 0 1 .796-.064c.157.071.316.137.478.198.267.1.47.327.517.608l.092.55c.15.903.932 1.566 1.849 1.566h.344c.916 0 1.699-.663 1.85-1.567l.091-.549a.798.798 0 0 1 .517-.608 7.52 7.52 0 0 0 .478-.198.798.798 0 0 1 .796.064l.453.324a1.875 1.875 0 0 0 2.416-.2l.243-.243c.648-.648.733-1.67.2-2.416l-.324-.453a.798.798 0 0 1-.064-.796c.071-.157.137-.316.198-.478.1-.267.327-.47.608-.517l.55-.091a1.875 1.875 0 0 0 1.566-1.85v-.344c0-.916-.663-1.699-1.567-1.85l-.549-.091a.798.798 0 0 1-.608-.517 7.507 7.507 0 0 0-.198-.478.798.798 0 0 1 .064-.796l.324-.453a1.875 1.875 0 0 0-.2-2.416l-.243-.243a1.875 1.875 0 0 0-2.416-.2l-.453.324a.798.798 0 0 1-.796.064 7.462 7.462 0 0 0-.478-.198.798.798 0 0 1-.517-.608l-.091-.55a1.875 1.875 0 0 0-1.85-1.566h-.344ZM12 15.75a3.75 3.75 0 1 0 0-7.5 3.75 3.75 0 0 0 0 7.5Z" clip-rule="evenodd" /></svg>');
    background-position: center;
    background-repeat: no-repeat;
    background-size: 38px;
    cursor: pointer;
    box-shadow: 0px 0px 6px 0px #0000001a;
    pointer-events: auto;
  }
</style>

<button type="button" data-cc="show-preferencesModal" id="preferencesModalButton" aria-label="Open cookie settings" style="display: none;"></button>

<script>
  var consentPreferenceButtonStyle = document.querySelector('[data-cc="show-preferencesModal"]').style;

  if (localStorage.getItem('cc_cookie')) {
    consentPreferenceButtonStyle.display = 'block';
  }

  window.addEventListener('cc:onModalShow', function() {
    consentPreferenceButtonStyle.display = 'none';
  });

  window.addEventListener('cc:onModalHide', function() {
    if (localStorage.getItem('cc_cookie')) {
      consentPreferenceButtonStyle.display = 'block';
    }
  });

  window.addEventListener('cc:onFirstConsent', function() {
    consentPreferenceButtonStyle.display = 'block';
  });
</script>
By adding this code to your main banner tag, you provide a compliant and user-friendly way for visitors to manage their cookie preferences anytime.
Remember you can customize the CSS (background color, position, icon, etc.) to match your site design.
The next step is to ensure your Google tags (like Google Analytics, Google Ads, Conversion Linker, etc.) fire correctly after the initial default consent state has been established.
With Google Consent Mode V2, Google tags can technically fire even if consent for cookies (analytics_storage, ad_storage) is initially 'denied'. In this state, they send cookieless pings for basic measurement and modeling purposes.
However, they must not fire before the
gtag('consent', 'default', defaultConsent)command has run.
To guarantee this correct timing, we will use the custom event (consent_init), which is pushed to the dataLayer immediately after the default consent state is set (as configured in the Set Default Consent State section).
In your GTM container, navigate to "Triggers" in the left-hand menu and click the "New" button.
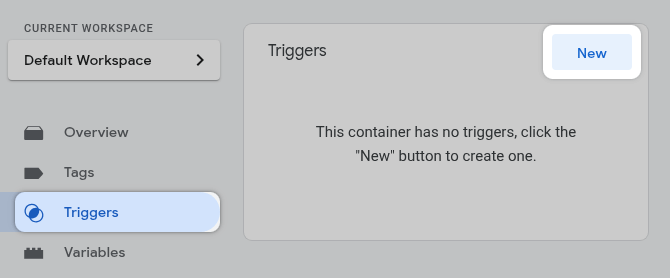
Click on the "Trigger Configuration" box to choose the trigger type.
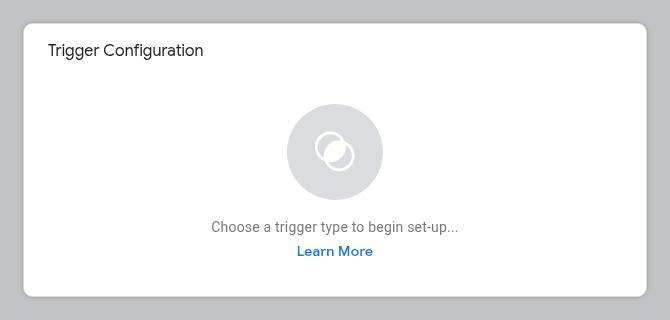
Select "Custom Event" from the list of trigger types.

In the "Event name" field, enter the exact name of the event pushed by your default consent script. Based on the refined script use consent_init.
Give your trigger a descriptive name, for example, "Consent Init Event".
Click "Save".
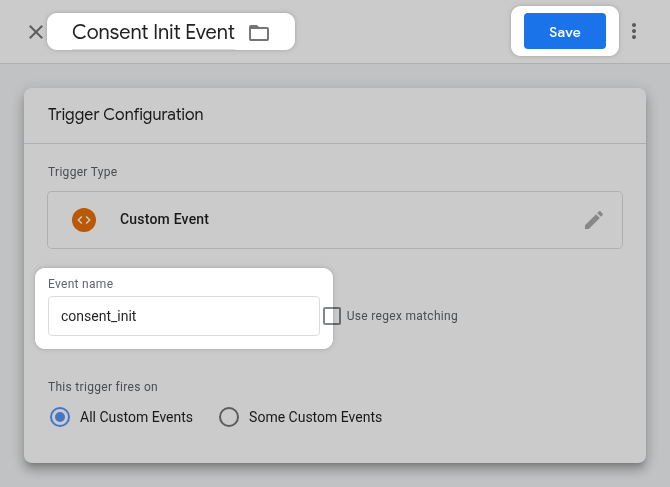
Now, you need to modify your Google tags to use this new "Consent Init Event" trigger instead of their previous triggers (like "Initialization - All Pages" or "All Pages").
Example: Configuring the Google Analytics (GA4) Google Tag
Go to "Tags" in the left-hand menu. Find your main Google Tag (the one firing your GA4 configuration).
If you don't have one, create it now:
-
Click "New".
-
Click "Tag Configuration".
-
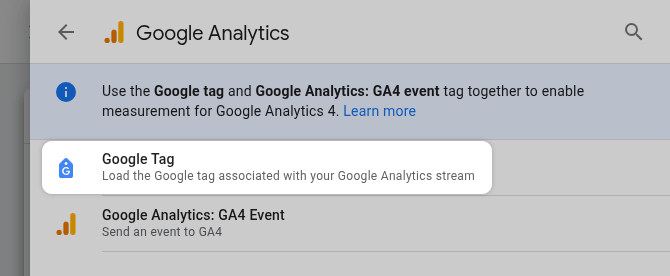
Choose "Google Analytics".

Select "Google Tag".
Enter your Google Tag ID (e.g., G-XXXXXXXXXX).
Scroll down to the "Triggering" section.
Remove any existing triggers like "Initialization - All Pages" or "All Pages".
Click inside the "Triggering" box to add a new trigger.
Select the "Consent Init Event" trigger you created.
Give your tag a clear name and click "Save".
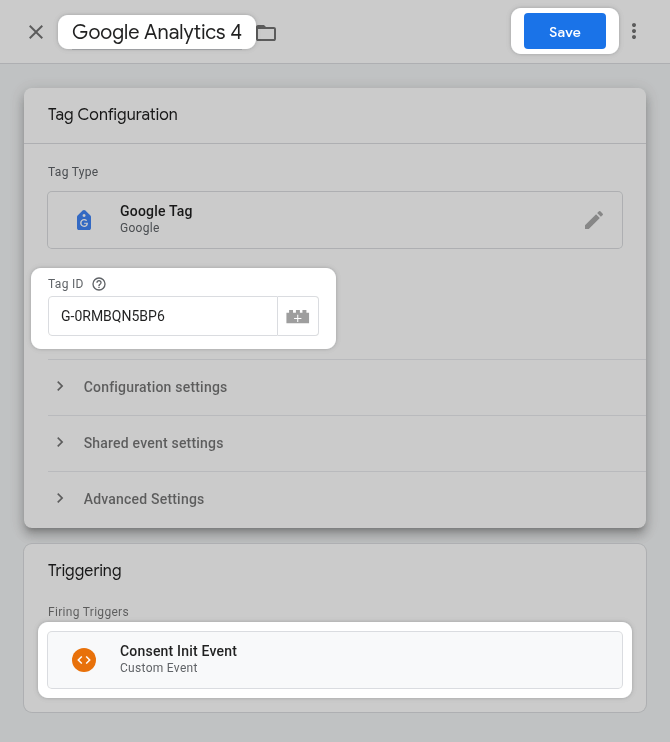
Repeat this process for all other Google tags that rely on Consent Mode. Ensure they only fire using the "Consent Init Event" trigger.
Now, let's test using GTM's Preview mode:
-
Click "Preview" in GTM. Enter your website URL and connect.
-
Observe the Tag Assistant summary timeline on the left.
-
You should see your custom event (
consent_init) appear in the timeline. -
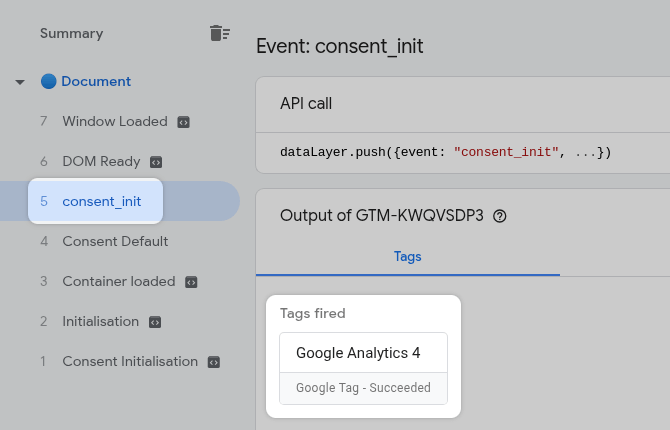
Click on this custom event in the timeline.
-
In the "Tags Fired" section, you should see your Google Analytics (GA4) Tag and any other Google tags you configured. They should not have fired earlier (e.g., on "Consent Initialization" or "Initialization").
-
Initial Load (Consent Denied): when your Google Tag fires on the
consent_initevent, ifanalytics_storage(and/orad_storage) is still'denied', the tag will send cookieless pings to Google Analytics / Google Ads. You won't see detailed user or session data in real-time reports immediately, but Google receives basic, aggregated information for modeling conversions and behavior. -
After Consent is Granted: when the user interacts with your banner and grants consent (e.g., accepts the "Analytics" category), your banner script runs
gtag('consent', 'update', {'analytics_storage': 'granted'}). The Google Tag (which already fired) will now be able to set cookies and send full, detailed measurement data to Google Analytics. You will then start seeing user/session data in your reports.

By triggering your Google tags after the default consent state is established using this custom event, you ensure compliance with Consent Mode V2 requirements while still benefiting from Google's cookieless ping functionality for data modeling when consent is initially denied.
So far, we've focused on setting up the consent banner and ensuring Google tags comply with Consent Mode V2, leveraging their built-in capabilities (like cookieless pings).
But what about other third-party tags, like Meta (Facebook) Pixel, LinkedIn Insight Tag, TikTok Pixel, etc.?
These tags often don't have the same level of built-in consent awareness as Google's tags. However, Google Tag Manager provides features to help manage their firing based on the consent state established by your banner and Consent Mode settings.
The key is to combine GTM's built-in consent checks with the custom events we configured our banner script to send.
Let's use the Meta (Facebook) Pixel tag as an example. We need to tell GTM that this tag requires specific consent types before it should be allowed to fully execute.
Assume you already have your Meta Pixel base code tag configured in GTM.
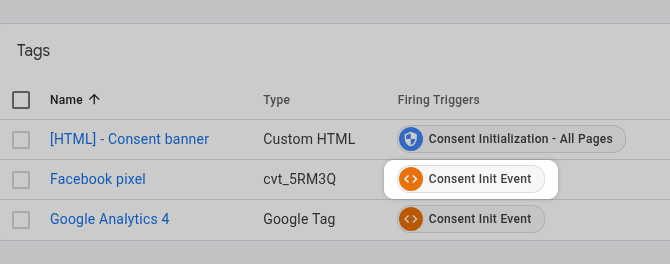
Set Initial Trigger: go to your Meta Pixel tag configuration. In the "Triggering" section, ensure it fires on the "Consent Init Event" trigger (consent_init event). This ensures the tag loads only after default consent is known.
Configure Built-in Consent Checks:
-
Scroll down within the tag configuration and expand "Advanced Settings".
-
Expand "Consent Settings".
-
You'll likely see "Not set". Change this to "Require additional consent for tag to fire".
-
Click "Add required consent" and select the consent type(s) this tag needs. For Meta Pixel, this will typically be
ad_storage,ad_user_dataandad_personalization.
Save the tag.
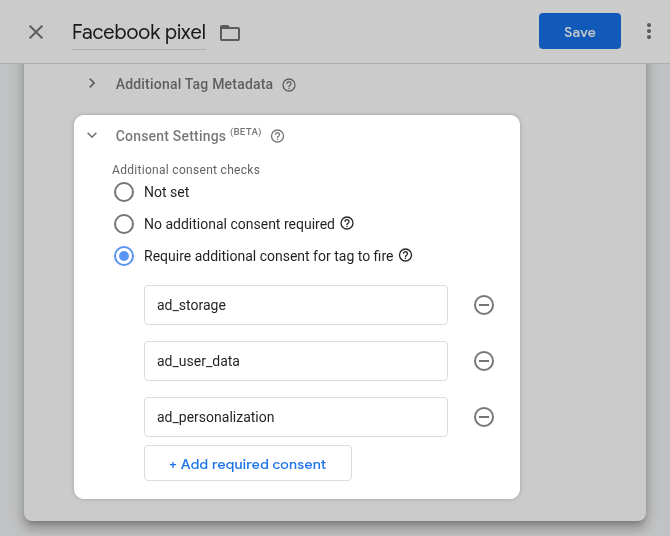
What this does: now, even though the tag's trigger (consent_init) fires on page load, GTM's built-in consent check will block the tag from fully executing unless ad_storage, ad_user_data and ad_personalization have a 'granted' status according to the current Google Consent Mode state.
Above setup only runs the tag once when the page loads. If the user says "yes" to consent later, without refreshing the page, the tag doesn't fire right away at that point.
To fix this, we need to make the tag fire also when the specific consent is granted. Remember those custom events our banner script pushes?
-
consent_accepted_necessary -
consent_accepted_analytics -
consent_accepted_advertising
We'll use consent_accepted_advertising for the Meta Pixel.
Create a New Trigger:
-
Go to "Triggers" > "New".
-
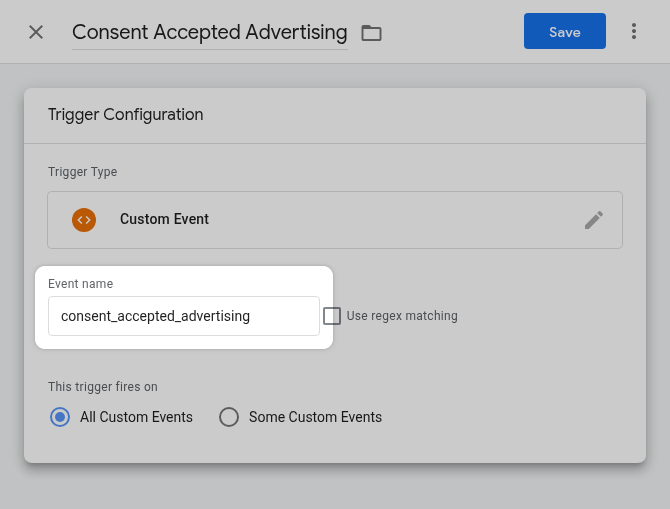
Configure it as a "Custom Event".
-
Enter the "Event name":
consent_accepted_advertising. -
Name the trigger descriptively, e.g., "Consent Accepted Advertising".
-
Click "Save".
Add the Second Trigger to the Tag:
-
Go back to your Meta Pixel tag configuration.
-
In the "Triggering" section, click inside the box to add another trigger.
-
Select the "Consent Accepted Advertising" trigger you just created.
-
You should now have two triggers listed for this tag: "Consent Accepted Advertising" and "Consent Init Event".
Save the tag.
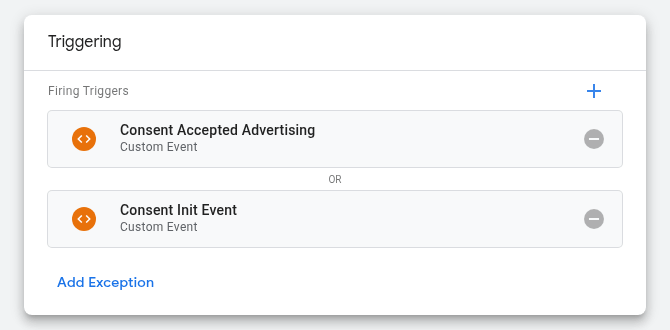
How this works: The tag will now fire if either the consent_init event happens OR the consent_accepted_advertising event happens.
The built-in consent check still applies in both cases. This ensures:
-
The tag fires on page load if consent was already granted previously.
-
The tag fires immediately when the user grants advertising consent mid-session.
-
The tag never executes if the required consent is
'denied'.
-
Open Preview mode.
-
Load your page. Initially deny advertising consent.
-
Use your banner or the settings icon to grant "Advertisement" consent.
-
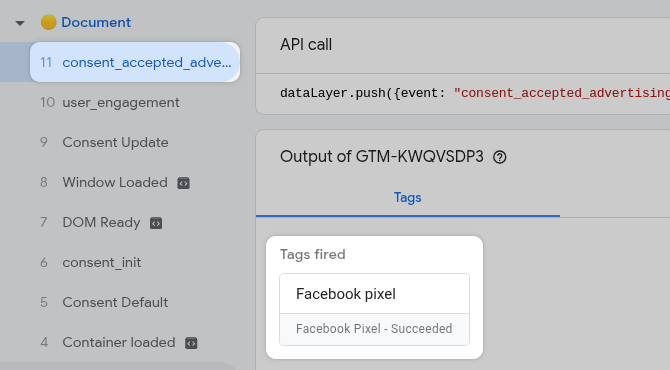
Observe the
consent_accepted_advertisingevent appear in the timeline. -
Click on this event. You should see the Meta Pixel tag fire. Check the Consent state –
ad_storage,ad_user_dataandad_personalizationshould now be granted, allowing the tag to execute fully.
Congratulations! If you've followed this guide step-by-step, you have successfully implemented a robust solution for Google Consent Mode V2 compliance.
You've navigated the essential components:
-
Setting the foundation: properly including the consent banner plugin files.
-
Defining your structure: configuring consent categories (
necessary,analytics,ads, or your custom ones) and linking them directly to Google Consent Mode parameters (analytics_storage,ad_storage, etc.). -
Crafting the user experience: setting up the banner text, language(s), and optional cookie details for transparency.
-
Activating the banner: initializing the
CookieConsentscript to handle user interactions (onFirstConsent,onChange) which trigger the crucialgtag('consent', 'update', consentData)commands. -
Ensuring early defaults: critically, implementing a separate tag to set the default consent state (
gtag('consent', 'default', ...)), respecting prior choices while defaulting to'denied'for non-essentials, using the vital "Consent Initialization - All Pages" trigger. -
Enabling user control: adding a mechanism (
data-cc="show-preferencesModal") for users to easily revisit and modify their consent choices at any time. -
Configuring tag firing: correctly adjusting your Google tags (like GA4) to fire after the default consent is set, using a custom event trigger (
consent_init). -
Managing third-party tags: leveraging GTM's built-in consent checks combined with custom event triggers (like
consent_accepted_advertising) to ensure non-Google tags also respect user consent and fire appropriately upon grant.
Implementing Google Consent Mode V2 is a necessary step in today's privacy-focused digital landscape. It bridges the gap between user consent requirements, marketing analytics, and advertising effectiveness.
While involving technical setup across HTML, CSS, JavaScript, and GTM configuration, the structured approach outlined here provides a clear pathway.
Remember that this guide provides technical implementation steps only, not legal advice.
Always consult with legal professionals specializing in data privacy (like GDPR, ePrivacy, CCPA, etc.) to ensure your specific consent banner text, category definitions, default states, and overall implementation meet all legal obligations for your specific audience and geographic regions.
Consent rates and regulations can change. Monitor your setup's performance and stay informed about updates to privacy laws and Consent Mode itself.
You've taken a significant step towards compliant and effective digital measurement and advertising. By respecting user choice while leveraging Consent Mode's capabilities, you're better positioned for a privacy-first future.
Leave a comment
The email address you provide will not be published. It will be used to notify you of any replies.