Meta Pixel (Facebook Pixel) & GTM Setup: A Simple Guide for Beginners
So, you need to get the Meta Pixel (formerly the Facebook Pixel) onto your website to track conversions and optimize your Meta ads.
In this simple, step-by-step guide, we'll walk you through exactly how to install the Meta Pixel on your website using Google Tag Manager (GTM).
Think of GTM as a free "toolbox" for managing tracking codes (like the Meta Pixel) without constantly editing your website's source code. Once GTM is installed, you can add, update, and manage your tags through its user-friendly interface.
Why use GTM for your Meta Pixel setup?
-
Simplicity. GTM provides straightforward ways to add tags, especially using pre-built templates.
-
Less Code Hassle. Avoid digging into website code for every tracking change.
-
Centralized Management. Keep your Meta Pixel, Google Analytics, and other tags organized in one place.
-
Site Speed Improvements. GTM itself loads asynchronously (doesn't block your page content), and it helps manage when other tracking tags fire, which can contribute to better overall page loading performance compared to hard-coding many individual scripts.
By the end of this guide, you'll have your Meta Pixel set up and ready to start collecting valuable data!
Before we jump into Google Tag Manager, let's make sure you have a few things ready. Having these sorted out beforehand will make the setup process much smoother:
-
A Live Website. You need a website where you want to install the Meta Pixel.
-
Google Tag Manager Account & Container. You should have already created a Google Tag Manager account and a container for your website. If you don't have one yet, you can create one for free at tagmanager.google.com
-
GTM Container Snippet Installed. The GTM container code (provided by Google Tag Manager when you create a container) must already be installed on all pages of your website.
Why? This is how GTM actually works on your site. If GTM isn't installed, adding tags inside GTM won't do anything.
-
Meta Business Suite / Business Manager Account. You need access to the Meta Business Suite (or the older Business Manager) where your advertising assets like Meta Pixel are managed.
-
Meta Pixel. You must have already created the specific Meta Pixel you want to install on your site.
Got all that ready? Great! Let's move on.

Before we add the Meta Pixel, let's quickly understand the three main building blocks you'll work with inside Google Tag Manager.
Knowing what these are will make the next steps much clearer:
-
Tags. Think of Tags as the actual tools or code snippets you want to add to your site. In our case, the Meta Pixel base code is the Tag we want to install. Other examples could be Google Analytics tracking code or LinkedIn Insight Tag. Tags are what you want to add.
-
Triggers. Triggers tell your Tags when to activate or "fire". You set rules for when a Tag should work. For the basic Meta Pixel installation, we want it to load on every page of our website, so we'll use a trigger that fires on "All Page Views" (will cover this later). Other triggers could fire on button clicks, form submissions, etc.
-
Variables. Variables are like little storage boxes that hold information that your Tags or Triggers might need. The main idea behind variables is to have one data source for all Tags and Triggers; when changed in one place, it will be updated everywhere it is used. GTM also has many built-in variables (like Page URL, Clicked Element, etc.) that can be used for more advanced tracking later.
For this initial setup, we'll paste our Pixel ID directly into the tag, but variables become very useful as your setup grows.
In summary: we will create a Tag for the Meta Pixel and tell it when to fire using a Trigger (on all pages).
That's the basic idea! Now, let's put it into practice.
Alright, let's get the Meta Pixel installed! We'll use a pre-built template from the GTM Community Template Gallery, which simplifies things greatly. Follow these steps carefully:
Log in to your Google Tag Manager account and open the container for your website.
In the left-hand navigation menu, click on "Tags".
Then click the "New" button in the top right corner of the Tags overview screen.

At the top of the new tag configuration window, click where it says "Untitled Tag".
Give your tag a clear and descriptive name. Something like "Meta Pixel - Base Code" or "Facebook Pixel - All Pages" works well. This helps you identify it later.

Click anywhere inside the large box labelled "Tag Configuration".

This will open the "Choose tag type" slide-out panel.
Instead of picking from the standard list, look for the banner "Discover more tag types in the Community Template Gallery" and click it.

In the Template Gallery search bar, type "Facebook Pixel".
You should see a template offered by "facebookarchive". This is the official and recommended one. Click on it.
Click "Add to workspace".
This template need permissions to load 3rd-party script into your website.
In the pop-up click "Add" button.

Now you need to configure your Facebook tag.
You will see "Facebook Pixel ID(s)" in the Tag Configuration section.
Note:
The exact field name in GTM might sometimes appear as just "Pixel ID" depending on template updates, but it serves the same purpose.
You need to enter you Meta Pixel ID into this field.
To find your Meta Pixel ID, go to your Meta Business Suite.
Click on the drop-down menu in the top left corner. Next select your "Business portfolio" and click on gear icon to enter the settings.

On the left click on "Datasets & pixels" under "Data Sources" menu.
Select your pixel and click on "Events Manager" link.
In the Event Manger window click on "Settings" and copy the "Dataset ID".

Paste your copied Dataset ID into the corresponding field in GTM (Facebook Pixel ID).
For the basic installation, ensure the standard event being tracked is "PageView". This is usually the default setting for the base code template, so you likely don't need to change anything here.

Leave other advanced settings at their defaults for now. We're just setting up the base tracking.
Below the "Tag Configuration" box, click anywhere inside the box labelled "Triggering".

Next select the trigger named "All Pages" (which typically corresponds to the Page View event type). This trigger is available by default in GTM.

Why "All Pages"?
This ensures your Meta Pixel base code loads on every single page of your website, which is necessary for tracking visitors consistently.
Once you've configured the Tag and the Trigger, click the blue "Save" button in the top right corner.

You've now created the tag! But we're not live yet. The crucial next step is testing.
You've created and saved your Meta Pixel tag in GTM. Now, we need to test it to make sure it's firing correctly. GTM has a fantastic built-in tool for this, called Preview Mode, and we'll also use Meta's own browser extension.
Important: Disable Ad Blockers During Testing!
Many ad blocker browser extensions will prevent the Meta Pixel (and sometimes GTM Preview itself) from loading. To ensure your testing is accurate, please temporarily disable your ad blocker(s).
In your GTM workspace (where you just saved your tag), look for the "Preview" button in the top right corner. Click it.

A new browser tab or window will open for the Tag Assistant. You'll be asked to enter your website's URL. Enter the full URL and click "Connect".

Important:
Don't forget to add the main Google Tag Manager code snippet to your website before previewing. If GTM isn't installed on the page, Preview Mode won't work.
Your website should open in a new browser tab with a "Tag Assistant Connected" badge displayed, usually in the bottom right corner. The Tag Assistant tab you opened initially will now show debugging information.
Go back to the Tag Assistant tab (the one that opened when you clicked "Preview").
In the left-hand summary panel, you should see page load events. Click on "Container Loaded".
In the main part of the window, look for the "Tags Fired" section. You should see the name you gave your Meta Pixel tag (e.g., Meta Pixel - Base Code).

If your tag is listed under "Tags Fired", it means GTM successfully triggered it based on the "All Pages" rule you set!
If it's under "Tags Not Fired", double-check your trigger configuration in GTM. Also, re-confirm that the main Google Tag Manager code snippet is correctly installed on your website.
You can also verify your Meta Pixel using the Chrome browser extension called Meta Pixel Helper.
You can add this extension in the Chrome Web Store, search for "Meta Pixel Helper" and install it. It's free.
To use the Meta Pixel Helper while in GTM Preview Mode, you also need the "Tag Assistant Companion" Chrome extension. This ensures the preview opens in a regular tab where extensions work, instead of a special pop-up window where they might be blocked.
If you have both extensions installed, open Preview Mode as shown in the previous step and navigate to your website tab. Then, click the Meta Pixel Helper icon in your browser's toolbar.
A small window will pop up. It should detect your Pixel:
-
Look for your Meta Pixel ID listed.
-
And "PageView" event listed with a green checkmark. This confirms the basic page tracking is working.
If you see your Pixel ID and the PageView event with green icons, congratulations! Your basic setup is working correctly.
Note:
Yellow icons in the Pixel Helper often indicate minor issues or opportunities for improvement (like potential event deduplication, which is more advanced), while red icons indicates errors. For this basic PageView setup, green is what you want to see.
Once you've confirmed everything is working correctly in Preview Mode, it's time to make your changes live for all website visitors.
Go back to your main GTM Workspace tab.

Click the "Submit" button in the top right corner.

Now choose "Publish and Create Version".
Give your version a descriptive "Version Name" (e.g., "Installed Meta Pixel Base Code").
Optionally, add a more detailed "Version Description" explaining what you changed.
Click the "Publish" button in the top right corner.

Now that your changes are published via GTM, let's do one final check directly within Meta's platform to see the data arriving.
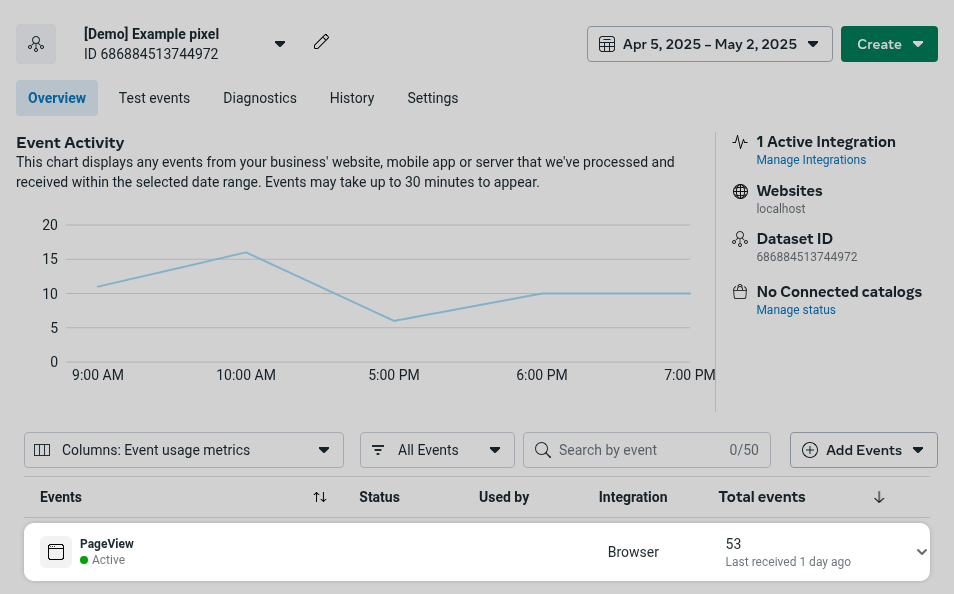
In your Events Manager "Overview" tab look for "PageView" activity. You should start seeing activity for the PageView events.
Confirm that PageView events are being recorded and that the graph shows recent activity corresponding to your testing or website visits after publishing.
Allow Some Time
It can sometimes take a few minutes for events to start showing up reliably in Events Manager.
Seeing the PageView events recorded in Events Manager is the confirmation that your Meta Pixel is successfully sending data to Meta.
Congratulations! Your Meta Pixel base code is now live on your website via Google Tag Manager.
Now that you've successfully installed the Meta Pixel using GTM, you might wonder if you still need the original Meta Pixel code snippet directly installed on your website pages.
The answer is NO!
In short:
Google Tag Manager will handle it. Remove any direct Meta Pixel code from your site files once you've published the Pixel tag within GTM.
-
Once you have correctly installed the Google Tag Manager container snippet on all your pages, and you have configured the Meta Pixel tag inside your GTM container (as we just did), GTM handles loading the Pixel for you.
-
Keeping the original Meta Pixel code snippet directly on your pages in addition to having it fire via GTM will cause problems.
-
Duplicate Tracking. The Pixel will likely fire twice on every page load (once from the direct code, once from GTM). This will inflate your traffic numbers, page views, and potentially other events in Meta Events Manager and Ads Manager, leading to inaccurate data.
-
Wasted Resources. Loading the same script twice unnecessarily uses bandwidth and can impact page performance.
If you previously had the Meta Pixel code snippet installed directly in your website's theme files, header, or footer before setting it up via GTM, you must remove the old snippet.
Ensure that only the Google Tag Manager container snippet remains on your website pages. GTM will now manage the Meta Pixel (and any other tags you add) from its central dashboard.
Congratulations! If you've followed the steps above, you have successfully installed the Meta Pixel base code on your website using Google Tag Manager. Your Pixel is now actively collecting data on page views, which is the essential first step towards optimizing your Meta advertising campaigns.
While the base code tracks who visits which pages, the real power comes from tracking specific actions users take on your site. This includes things like:
-
Viewing specific product pages
-
Adding items to a cart
-
Starting the checkout process
-
Making a purchase
-
Submitting a lead form
-
And many more...
Tracking these actions (events) allows you to measure conversions accurately, build targeted audiences, and let Meta's algorithms optimize your ad performance.
Beyond the Technical Setup: Don't Forget Privacy!
Getting the Meta Pixel firing is a great technical step, but remember that responsible tracking involves respecting user privacy and complying with regulations like GDPR and CCPA. Simply installing the pixel isn't enough; you need to manage user consent properly.
This means configuring how and when your pixel (and other tags) fire based on the choices your visitors make via a cookie banner or consent tool.
For a comprehensive walkthrough on setting this up, please read our guide: Google Consent Mode V2 Free Setup Guide.
For now, well done on getting your foundation in place!
Leave a comment
The email address you provide will not be published. It will be used to notify you of any replies.