Simple Meta Pixel Conversion Tracking with Google Tag Manager
Conversion tracking is the cornerstone of any successful ad campaign, telling you exactly which ads are leading to valuable customer actions like purchases, leads, or sign-ups. Without it, you're just guessing what works.
This guide is all about simple, URL-based conversion tracking for your Meta Pixel. We'll show you how to tell Meta when a conversion happens simply because someone landed on a specific page on your website – like:
/thank-you.html
/form-submitted/
/success.php
etc.
We'll explore two straightforward methods to get this done:
-
Method 1: setting up Meta Custom Conversions directly within the Meta Events Manager.
-
Method 2: using Google Tag Manager (GTM) to fire a Meta Pixel event when a specific page is viewed (recommended).
While both methods achieve URL-based tracking, we'll also discuss why one approach offers significant advantages, especially when it comes to building valuable audiences for your campaigns.
Before we dive in:
This guide assumes you already have the Meta Base Pixel installed on your website, ideally using Google Tag Manager. If you haven't done that yet, please check out our comprehensive guide first: How to Install Meta Pixel with GTM. That's our starting point.
So, what exactly do we mean by "URL-based conversion tracking"? It's one of the simplest and most common ways to tell advertising platforms like Meta that a desired action has occurred on your website.
At its heart, URL-based conversion tracking works on a straightforward principle: if a user visits a specific page on your website, we count that visit as a conversion.
This method is perfect when a key action on your site naturally leads a user to a unique confirmation or "thank-you" page. Instead of trying to detect complex clicks or form submissions in real-time (which we'll cover in more advanced guides), we simply tell Meta: "Hey, anyone who lands on this particular URL has completed the goal."
-
Lead Form Submissions. A user fills out your contact form or a lead generation form. Upon successful submission, you redirect them to a unique page. A visit to this page signals a new lead.
-
Purchases. A customer completes a checkout process on your site. After payment, they are typically sent to an order confirmation page. This page view equals a purchase.
-
Newsletter or Service Sign-ups. Someone subscribes to your email newsletter or signs up for a free trial. They are then often redirected to a confirmation page. Again, we can count this page visit as a conversion.
The beauty of this method lies in its simplicity. You don't need to add special JavaScript snippets to buttons or forms to detect the action. The existing page view is the trigger.
The logic is clear – if they see the page, they converted.
The key requirement for this method to work effectively is that you have these unique confirmation ("thank-you") pages for each conversion action you want to track. If your form submits without a redirect to a new URL, or if multiple different actions lead to the same generic "thank-you" page, URL-based tracking becomes less precise (and that's when more advanced event tracking comes into play).
Next, we'll look at the prerequisites before setting up the tracking itself.
Before we jump into the setup steps, let's make sure you have everything you need. Getting these basics in place first will make the process much smoother.
-
Meta Pixel Base Code Installed: the Meta Pixel's main tracking code must already be installed and firing correctly on all pages of your website.
Crucially, we highly recommend installing it via Google Tag Manager. If you haven't done this yet, or if you're unsure, please stop here and follow our step-by-step guide: How to Install Meta Pixel with GTM.
This article assumes your base pixel is active and managed through GTM.
-
Access to Your Meta Business Suite (Events Manager): you'll need to be able to log in to your Meta Business Suite and navigate to the Events Manager to create Custom Conversions, and verify that your events are firing.
-
Access to Your Google Tag Manager (GTM) Container: you’ll need publishing rights for the GTM container linked to your website to create new tags and triggers and to ensure the base pixel is correctly set up.
-
Know Your Conversion Page URLs: identify the exact URLs of the "thank-you" or confirmation pages that signify a conversion. For example:
-
/thank-you-for-your-order.html -
/contact-form-submitted/ -
/subscription-confirmed.php
-
Once you've ticked off all these prerequisites, you're ready to start tracking those valuable conversions!
This first method involves setting up "Custom Conversions" directly within your Meta Events Manager. It's often seen as the quickest way to start tracking URL-based conversions.
What are Meta Custom Conversions?
In simple terms, Meta Custom Conversions allow you to tell Meta: "When someone visits a URL that matches this rule I'm creating, count it as a specific conversion". You define these rules right inside the Meta platform without adding any new code to your website.
Important Note
Don't confuse "Custom Conversions" (which we're setting up here in the Meta interface) with "Custom Events" (which are specific actions you define and send with code).
Both can be useful for ad optimization. You can create a Meta Custom Conversion using a Custom Event (or Standard Event) as its source. This gives you extra flexibility if you want to track very specific variations of an existing event.
When Might You Use This Method?
You might consider this method if:
-
You need an extremely fast way to set up basic conversion counting for Meta's ad delivery optimization.
-
And you have no plans to create audiences from these specific converters.
-
Your business is in a category where Meta's policies prevent you from directly tracking specific standard events that may be considered sensitive, such as
Lead,Purchase,CompleteRegistration, etc.
Log in to your Meta Business Suite.
From the main menu click on "All tools".

Find and select Events Manager.

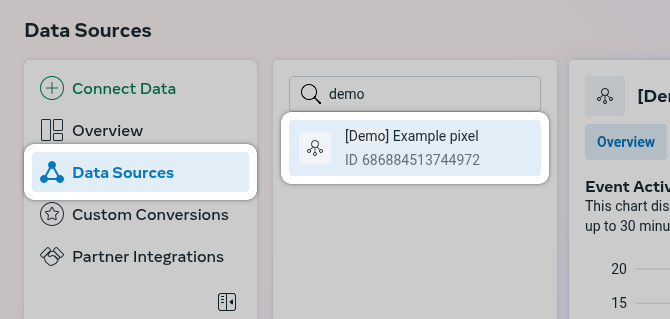
In Events Manager, on the left-hand side, click on "Data sources".
Next, click on your Meta Pixel.
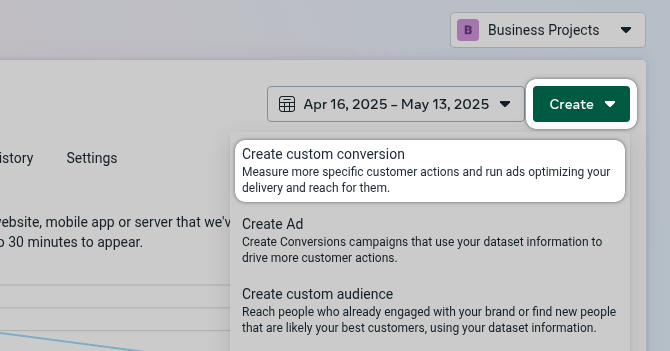
In the top right corner click the "Create" button.
And select "Create custom conversion".
In the pop-up window, enter a clear "Name" for your conversion.
Make sure you have selected the correct Meta Pixel in the "Data source" dropdown field.
Select "Website" from the "Action Source".
For the "Event", select "All URL traffic" from the dropdown.
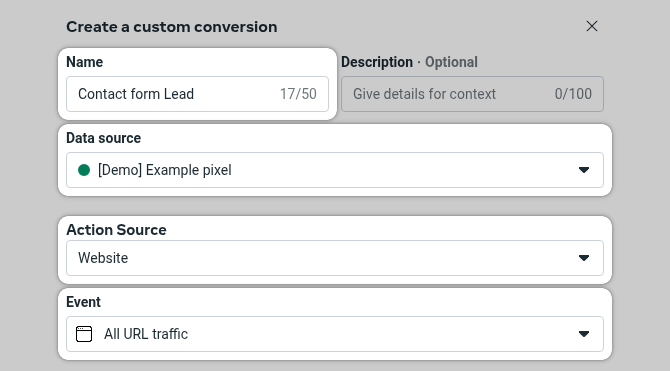
Under "Choose a standard event for optimization," click on "Select your own category".

From the list that appears, select the standard event category that best represents your conversion (e.g., Lead, Purchase, CompleteRegistration). This helps Meta understand the action and can improve ad optimization.

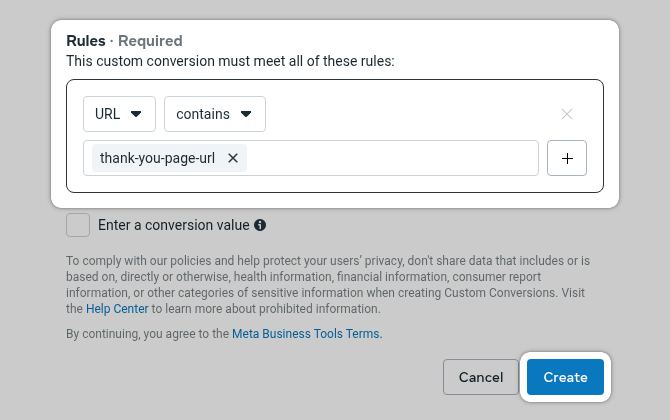
The Rules section is the core of this setup.
Ensure the first dropdown is set to "URL".
In the second dropdown, select your matching condition. "Contains" is generally the most robust and recommended option.
In the text box next to "Contains" (or your chosen operator), enter a unique part of your "thank-you" page's URL path. Example: If your conversion page is www.your-site.com/thank-you-contact/, you could enter: /thank-you-contact
And click "Create".
Avoid using the full URL
http://www...unless you use "Equals" and are certain of all URL variations (like http, https, www, non-www).
Conversion value
The field "Enter a Conversion Value" is optional, but this can help you optimize your ads. If this conversion has a fixed monetary value (e.g., a specific product purchase always leads to a confirmation page, and the product is $25), you can enter
25and select your currency.
Important: Disable Ad Blockers During Testing!
Many ad blocker browser extensions will prevent the Meta Pixel (and sometimes GTM Preview itself) from loading. To ensure your testing is accurate, please temporarily disable your ad blocker(s).
Go to your Meta Events Manager.
Select your Pixel, then go to the "Test Events" tab.
Click on "Confirm your website’s events are set up correctly".
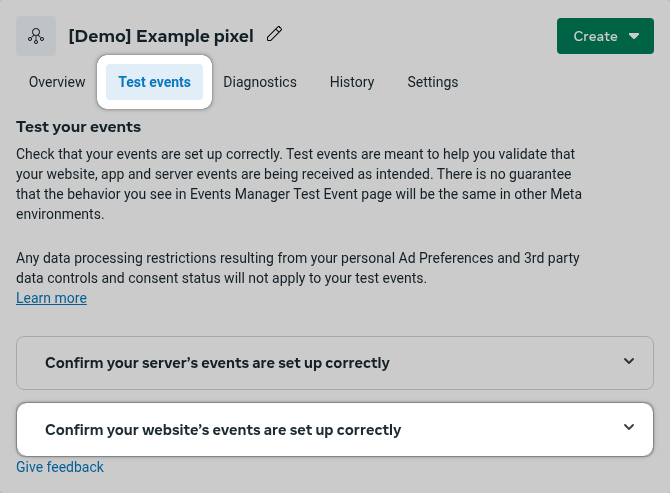
Enter your website's URL and click "Test Events".
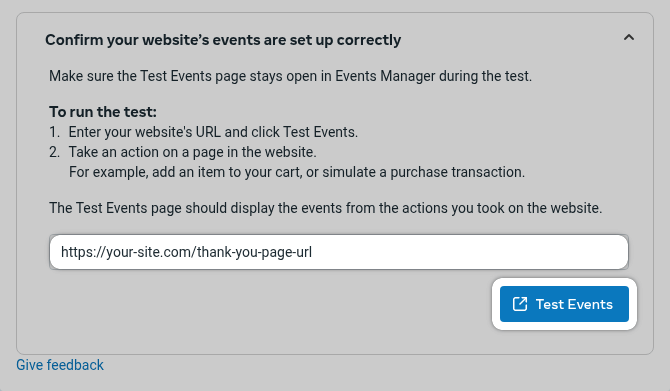
If your GTM tag fired correctly and you navigated to the "thank-you" page, you should see the "Constum Conversion" (e.g., "Contact form Lead") appear in the list of received events.

Sometimes it doesn't appear right away. You either have to wait a bit, or refresh the page.
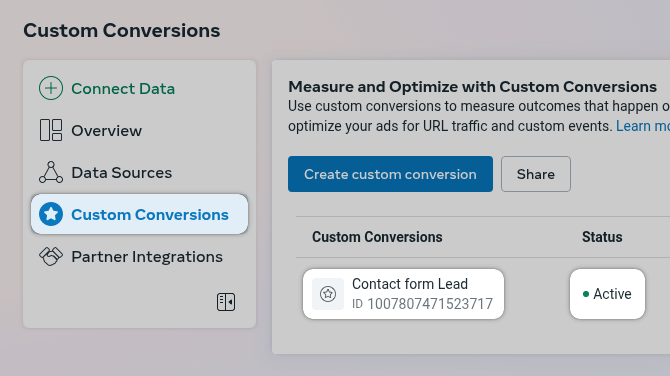
If you're unsure, you can also check the status of the Custom Conversion itself.
Navigate back to the "Custom Conversions" section.
Find your newly created custom conversion in the list. Its status should be "Active" once it has received data.
An "Active" status confirms it's working.
Pros:
-
Extremely Simple Setup. If your base Pixel is working, this is very quick to configure directly in Meta's interface.
-
No GTM Changes Needed. You don't need to create new tags or triggers in GTM for this method.
-
Managed Entirely in Meta. Some users prefer keeping this configuration within the Meta platform.
-
Ability to track conversions in some restricted categories. Meta has business categories that are restricted to track events like "AddToCart", "Purchase", "Lead", etc. But you might be able to create Custom Conversions based on "PageView" (All URL traffic) and your website URL for these scenarios.
Some categories (e.g., "Health and wellness") in some regions (e.g., Europe) maybe fully restricted for tracking, so even tracking "PageView" events might be restricted. This means that creating a Custom Conversion based on URL traffic also wouldn't be possible.
Cons:
-
Cannot Be Used for Custom Audiences. This is a critical limitation. You cannot create Custom Audiences in Meta Ads Manager based on users who complete a conversion tracked via these Meta Custom Conversions. This means:
-
No direct retargeting of these specific converters.
-
No creating Lookalike Audiences from these specific converters.
-
-
Less Flexible with Data. While you can set a static conversion value, it's not suited for dynamic values (e.g., different purchase amounts).
-
Dependent on Stable URLs. If your website's URL structure for "thank-you" pages changes, your tracking will break until you update the rules. This method also doesn't work for actions that don't lead to a unique URL, like on-page form submissions without a redirect.
While Meta Custom Conversions offer the path of least resistance for setup, the inability to use them for creating Custom Audiences is a deal-breaker for many advertisers. Audience building is a cornerstone of sophisticated Meta advertising strategies (retargeting campaigns, excluding converters, building Lookalikes).
Because of this significant limitation, we generally do not recommend Meta Custom Conversions as your primary or sole method for tracking conversions.
Consider them if:
-
You only need basic reporting numbers and are certain you will never need to create an audience from those specific converters.
-
As mentioned above, if your business is in a restricted category where you cannot track more specific events (like "AddToCart," "Purchase," "Lead") due to policy considerations, Custom Conversions based on URL traffic might be your only option for some level of tracking.
For most businesses aiming for robust and flexible tracking (using GTM to fire a Standard Event) is the superior choice, primarily due to its full audience creation capabilities.
Now, let's explore what we consider the more robust and flexible method for tracking URL-based conversions: using Google Tag Manager (GTM) to fire a specific Meta Pixel event when a user lands on your designated conversion page.
This approach offers significant advantages, most notably the ability to use these conversion events to create Custom Audiences for retargeting, exclusions, and Lookalike Audiences. This capability is a crucial element for advanced Meta Ads strategies.
The Concept
Instead of defining the conversion rule inside Meta, we'll set it up in GTM. We'll tell GTM: "When a page loads, and its URL matches our 'thank-you' page, fire a specific Meta Pixel event (like
Lead,Purchase, etc.)".
This requires two main steps in GTM:
-
Create a Trigger. This tells GTM when to fire our tag (i.e., on which page view).
-
Create a Tag. This tells GTM what to fire (i.e., the Meta Pixel event itself).
Let's assume you want to track a "Lead" conversion when someone lands on your /thank-you-page-url page.
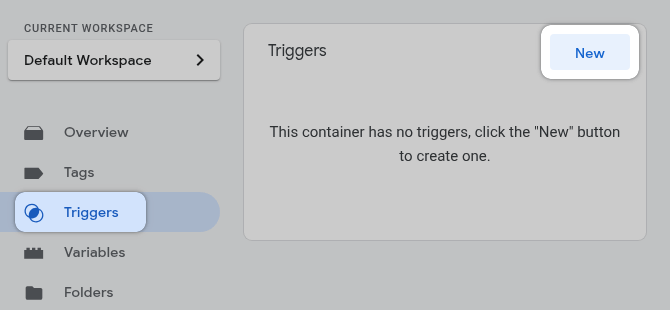
In your GTM container, click on "Triggers" in the left-hand navigation menu.
Next, click the "New" button to create a new trigger.
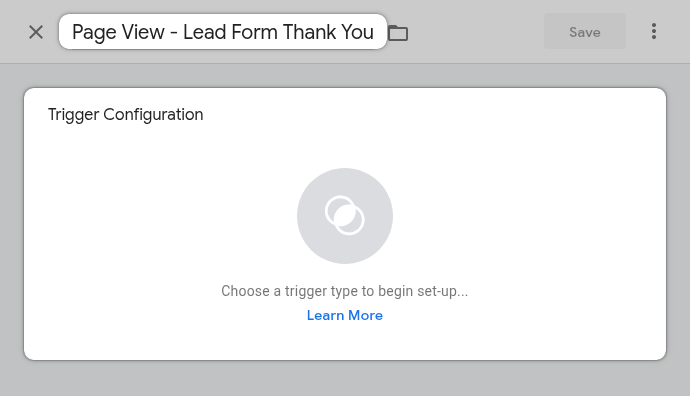
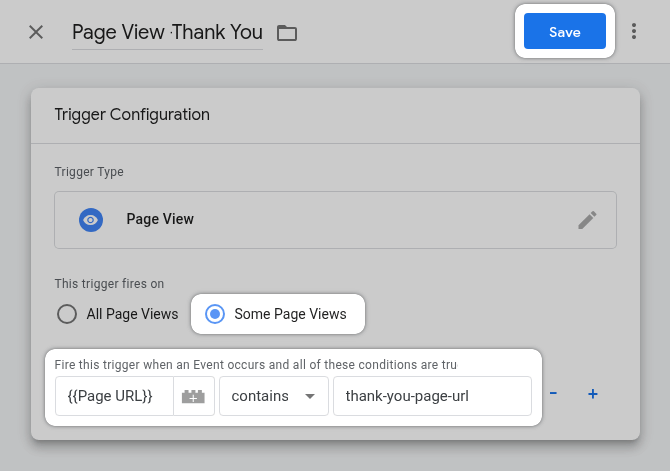
Give your trigger a descriptive name. Example: "Page View - Lead Form Thank You".
Start the Trigger Configuration by clicking anywhere on the large "Trigger Configuration" box.
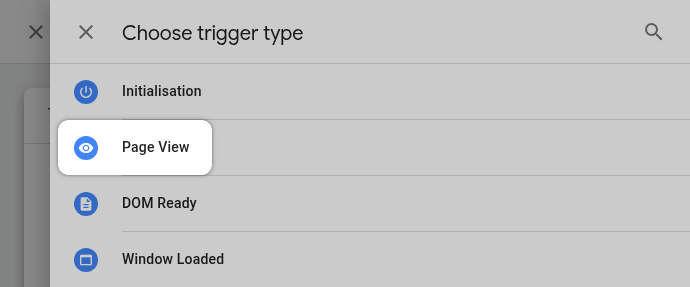
For "Choose trigger type," select "Page View".
Under "This trigger fires on", select "Some Page Views".
This is where you specify your "thank-you" page URL.
In the first input, choose a variable {{Page URL}}.
In the second dropdown, select "contains".
In the text box, enter the unique part of your "thank-you" page URL path. Example: /thank-you-page-url
And click on "Save".
Now that GTM knows when to act, let's tell it what to do.
Click on "Tags" in the left-hand navigation menu.
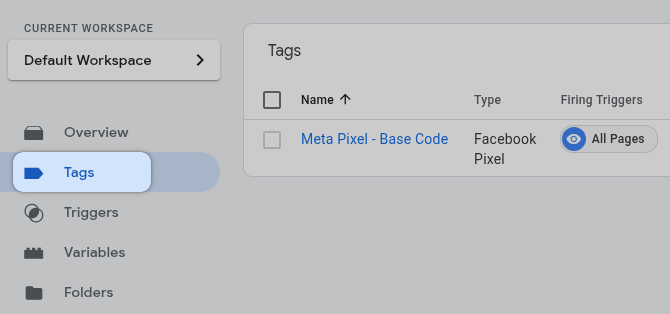
Click the "New" button.

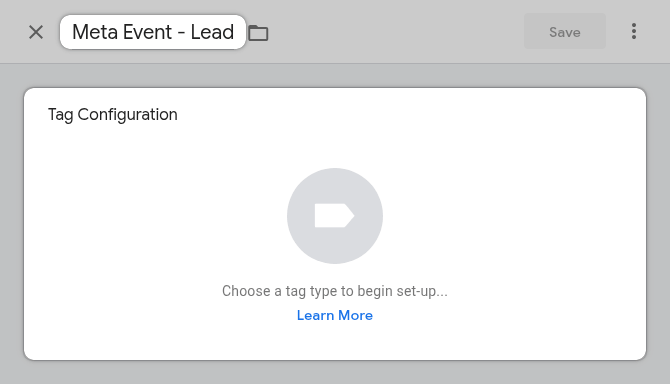
Give your tag a descriptive name. Example: "Meta Event - Lead".
Then, click anywhere on the large "Tag Configuration" box.
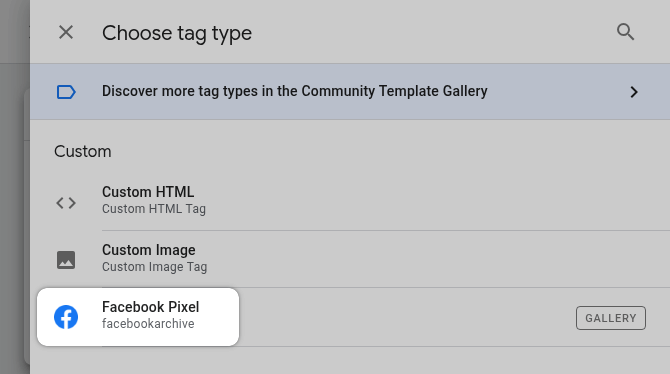
Under "Choose tag type," find and select the "Meta Pixel" tag template (or "Facebook Pixel").
This assumes you've already added the official Meta Pixel template to your GTM workspace, as covered in our first guide on installing the Meta Pixel with GTM
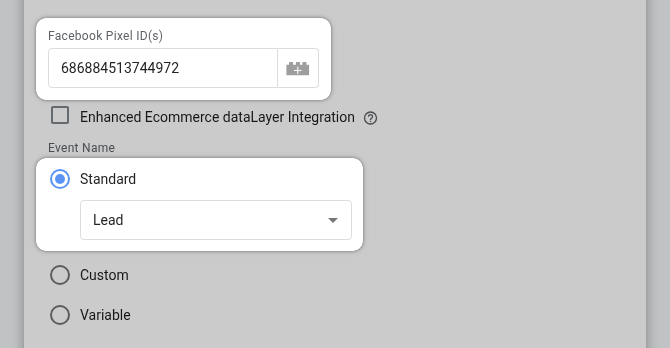
Enter your Meta Pixel ID into the "Facebook Pixel ID(s)".
From the "Event Name" dropdown, select "Standard".
From the "Standard Event Name" dropdown that appears, choose the Standard Event that best represents your conversion. For our example, we'd select "Lead".
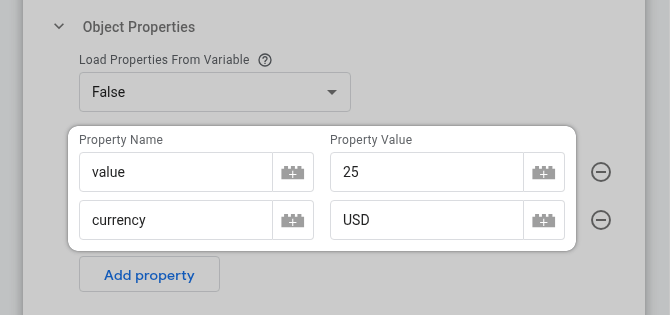
If your conversion has additional values, you can set them in the "Object Properties" section.
For our "Lead" example, we'll add value and currency.
Click on "Object Properties" to expand the section.

Click on "Add property".

Enter the parameter key into the "Property Name". In our example we'll use two properties: value and currency.
For the "Property Value" enter your specific values.
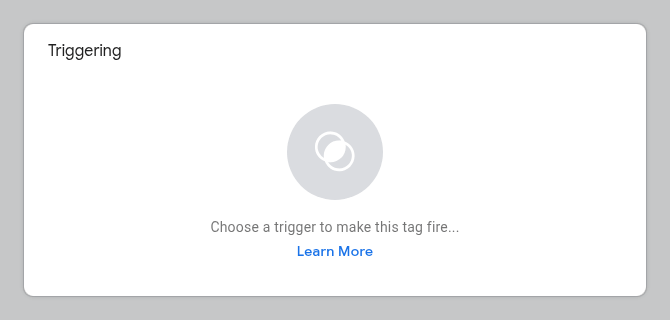
Scroll down and click on the "Triggering" box below the tag configuration.
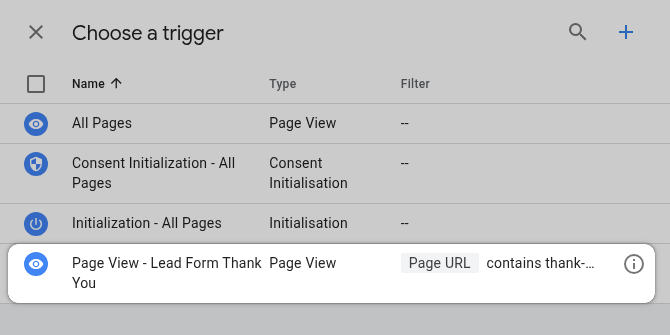
Select the trigger you created in previous step (e.g., "Page View - Lead Form Thank You").
Click the "Save" button in the top right corner.

Before your new tracking goes live, it's vital to test it.
Important: Disable Ad Blockers During Testing!
Many ad blocker browser extensions will prevent the Meta Pixel (and sometimes GTM Preview itself) from loading. To ensure your testing is accurate, please temporarily disable your ad blocker(s).
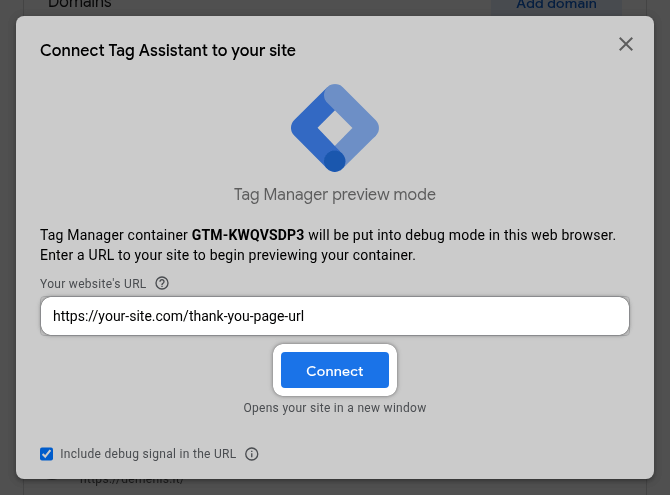
Click the "Preview" button in the top right.

Enter your website's URL and click "Connect".
You can enter your final "thank-you" URL directly. Or you can enter the page with contact form first on the page, fill the form, and the result after the actual redirect.
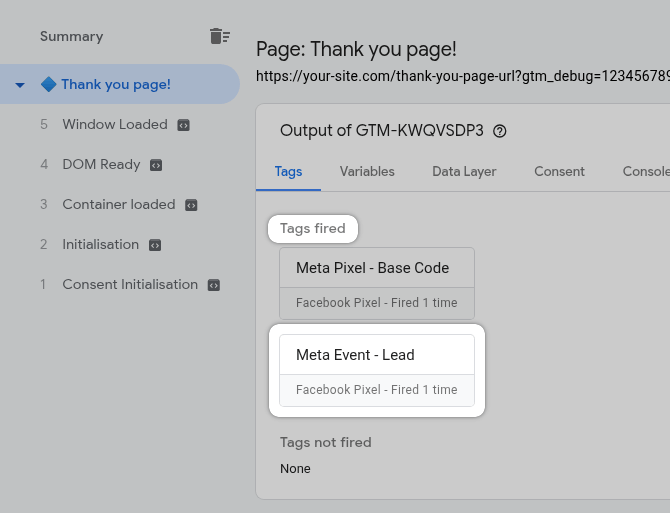
After you land on your "thank-you" page, look at the GTM debug pane.
Under the "Tags Fired" section you should see your new Meta event tag listed.
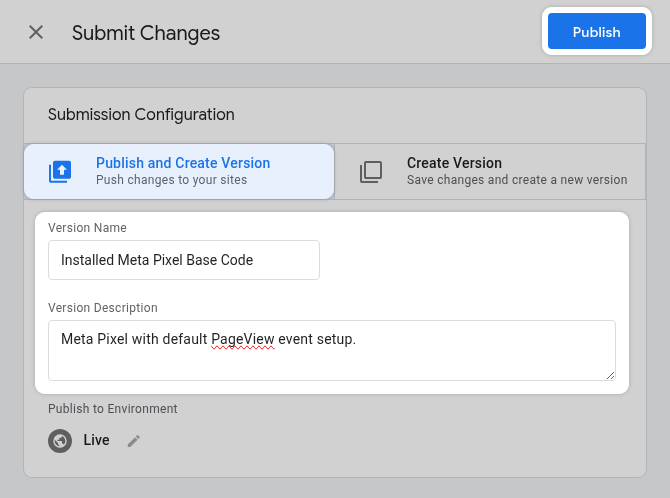
Once you're confident it's working correctly, go back to GTM.
Click the "Submit" button in the top right.

Give your version a descriptive name and click "Publish".
Now let's verify our implementation is working in Meta Events Manager.
Go to your Meta Events Manager.
Select your Pixel, then go to the "Test Events" tab.
Click on "Confirm your website’s events are set up correctly".

Enter your website's URL and click "Test Events".

If your GTM tag fired correctly and you navigated to the "thank-you" page, you should see the Standard Event (e.g., "Lead") appear in the list of received events.

Pros:
-
Full Audience Capabilities. This is the biggest win. Standard Events fired via GTM can be used to create Custom Audiences (retargeting, exclusions) and Lookalike Audiences.
-
Better Organization. Keeps all your tracking tag logic within GTM, alongside other marketing tags.
-
Future Flexibility. Easier to evolve. You can add more parameters, adjust triggers, or switch to more complex event tracking.
-
Leverages Standard Events. Using Meta's predefined Standard Events helps their system understand the actions better for optimization.
-
Create Custom Conversions Based on Events. You can create additional Custom Conversions based on the events and narrow your targeted conversions by URL or event parameters conditions.
Cons:
-
Event Tracking May Be Restricted. As mentioned in the previous method Pros, your business category may be restricted from tracking events.
-
Slightly More Setup Steps. Involves creating both a trigger and a tag in GTM, which is a few more clicks than Meta Custom Conversions.
-
Requires Basic GTM Familiarity. Users need to be comfortable navigating and publishing in GTM.
This GTM method, while involving a few more initial steps, sets you up for more powerful and flexible Meta advertising in the long run, primarily due to the critical audience-building capabilities it unlocks.
You've now seen two distinct methods for tracking simple URL-based conversions for your Meta Pixel:
-
setting up Custom Conversions directly in Meta,
-
and using Google Tag Manager to fire Standard Events.
So, which one should you pick?
Our Overall Recommendation:
Unless you fall into the very specific scenarios outlined for Method 1 (especially the audience limitation or sensitive category constraint), we strongly advise investing the slightly extra setup time for Method 2 (GTM with Standard Events).
The long-term benefits, particularly the ability to create and use Custom Audiences, far outweigh the minimal extra effort for most businesses.
This GTM-based approach provides a more robust, flexible, and strategically sound foundation for your Meta Pixel conversion tracking.
Congratulations! You've now explored two effective methods for setting up simple, URL-based conversion tracking for your Meta Pixel.
Remember, understanding which ads drive valuable actions like leads and purchases is fundamental to optimizing your campaigns and maximizing your return on ad spend.
By following the steps outlined, you can gain much clearer insights into your ad performance. Start with these URL-based methods, get comfortable with the data, and watch how it transforms your advertising approach.
What's Next? Beyond URL Tracking
Tracking visits to "thank-you" pages is a fantastic start, but what about conversions that don't have a unique URL? Think button clicks (like "Add to Cart" or "Download PDF"), form submissions that happen on the same page, or other specific user interactions.
Stay tuned for our next guide in this series, where we'll dive into "Advanced Meta Pixel Event Tracking with Google Tag Manager." We'll cover how to track these more complex actions, giving you even deeper control and understanding of your customer journey.
Happy tracking.
Leave a comment
The email address you provide will not be published. It will be used to notify you of any replies.
