The Ultimate Guide to Form Conversion Tracking (for GA4 & Meta Pixel)
You've done the hard work. You've built the perfect landing page, crafted compelling copy, and are driving qualified traffic to your web forms. Leads should be rolling in, and your ad platforms should be optimizing toward those valuable conversions.
But when you check your reports, you're met with a marketer's worst nightmare: (not set), zero conversions, or numbers that just don't add up. Your GA4 reports are blind to your leads, your Meta Pixel isn't firing on form submits, and your Google Ads conversions are broken.
You're not alone. Inaccurate form tracking is one of the most common and frustrating challenges in digital marketing today. It forces you to make decisions in the dark and wastes your ad spend on campaigns that might be working.
The good news is, you can fix this. In this comprehensive guide, we'll demystify form conversion tracking. First, we'll walk you through the traditional, step-by-step process of setting up reliable tracking using Google Tag Manager.
Then, we'll introduce a much simpler, more reliable way to automate your form tracking across all your marketing platforms without coding.
If you've struggled to set up tracking, it's not because you're doing something wrong — it's because modern web forms have outgrown old tracking methods. The classic "track a thank you page" approach is no longer enough.
Here are the four main culprits that break your conversion tracking:
Many modern forms don't redirect to a separate "thank you" page. Instead, they display an inline success message right on the page (e.g., "Thanks for your submission!"). While this is a great user experience, it makes traditional pageview-based goal tracking impossible. Your analytics platform is waiting for a new page to load, but it never does.
Forms that submit data without a full page refresh are often called AJAX or dynamic forms. They send information to the server in the background. Google Tag Manager's built-in "Form Submission" trigger often fails to detect these events because it's listening for a standard browser submission that never happens.
Third-party embedded forms often live inside an iframe — think of it as a webpage within a webpage. For security reasons, your main page (where your GTM and analytics scripts are) can't easily see what's happening inside that iframe, because it is isolated from your website. This makes tracking submissions from embedded forms notoriously difficult.
To get a complete picture, you need to send conversion data to multiple destinations: GA4 for analysis, Meta for ad optimization, Google Ads for performance tracking, and maybe more. Setting up and debugging each of these tags individually is time-consuming and error-prone. A small mistake in one tag can lead to data discrepancies that erode your trust in your own reports.
Google Tag Manager (GTM) is a powerful tool that gives you granular control over your tracking. If you're willing to get a bit technical, you can use it to capture most form submissions, even those without a "thank you" page.
A Quick Word of Caution
This method is powerful but can be brittle. Its success depends on your website's underlying code. If your developers change the form's structure, your tracking can break without warning. Always test your tracking after making any site updates.
Let's walk through the process of tracking a standard "Contact Us" form and sending the data to both GA4 and the Meta Pixel.
Tracking Attempts vs. Success
Please be aware that this GTM method primarily tracks the user's attempt to submit a form. It fires when the submit action is initiated, which can happen even if required fields are empty and the form shows an error.
Achieving 100% accurate tracking of only successful submissions with GTM often requires more advanced techniques, like asking a developer to implement a
dataLayer.pushevent or setting up complex "Element Visibility" triggers to watch for a success message.For this guide, we are showing the standard GTM approach, but it's crucial to understand this limitation.
Before GTM can identify forms, you need to tell it what to look for.
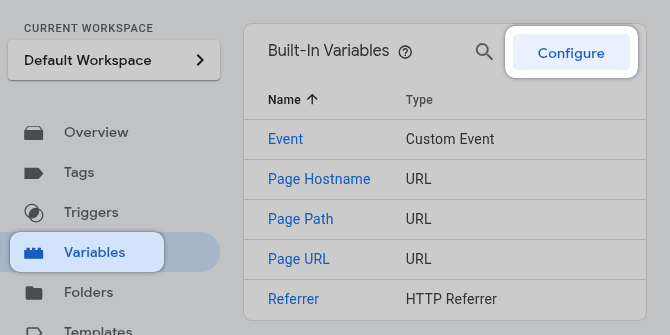
In your GTM container, navigate to Variables in the left-hand menu.
Click the "Configure" button next to the "Built-In Variables" sub-section.
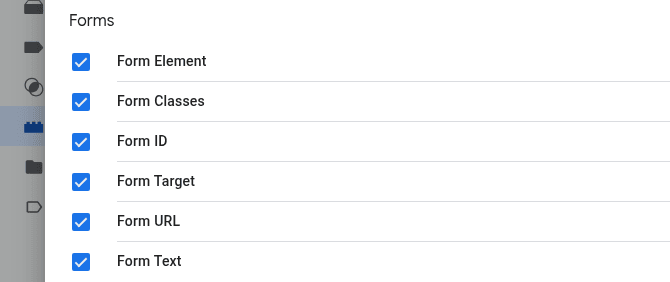
Scroll down to the Forms section and check the boxes for all form-related variables.
Next, we'll create the listener that "hears" when any form is submitted on your site. We'll start by being general and then refine it.
Go to "Triggers" in the left-hand menu and click the "New" button.
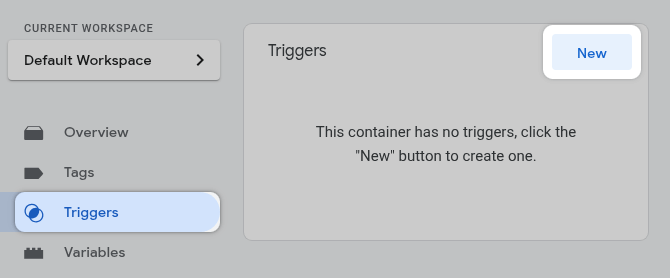
Name your trigger (e.g., "All Form Submissions").
And click "Trigger Configuration" area.
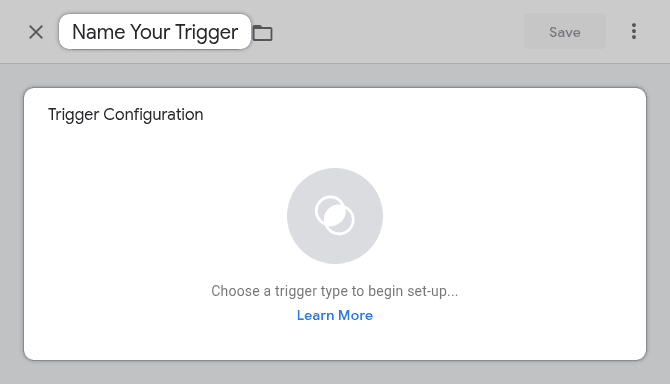
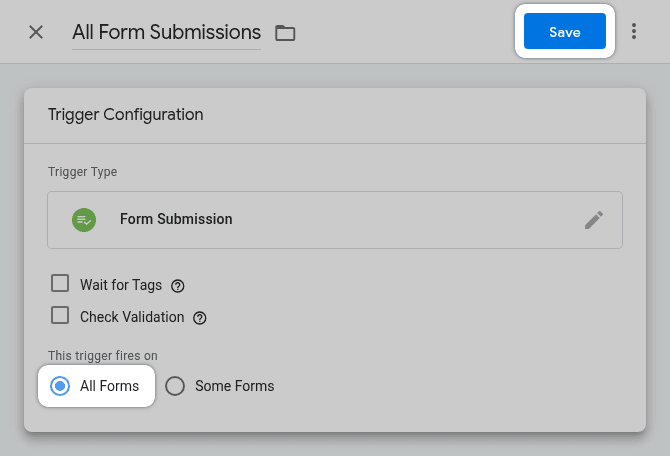
Choose the Form Submission trigger type.

For now, leave it set to All Forms. This will help us identify our form in the next step.
And click "Save" button.
We'll use GTM's Preview Mode to see what data it captures when your form is submitted.
Click the Preview button in the top right corner of GTM.

Enter your website's URL and connect.
On your site, navigate to the page with your contact form.
Fill out the form with test information and click the submit button.
Look at the GTM Preview debug panel. On the left-hand side, you should see a Form Submit event appear in the timeline.

If you do not see a Form Submit event, stop here and skip to the "What If It Still Doesn't Work?" section below.
Let's make our trigger more specific so it only fires on a particular form. The Form Submit event is triggered whenever any form is submitted on your site — including things like search boxes — so it's important to narrow it down.
Select the Variables tab in the main panel. Here you'll see the values of the variables you enabled in Step 1. Look for a unique Form ID (like contact-form) or a Form Class (like contact-form-wrapper).
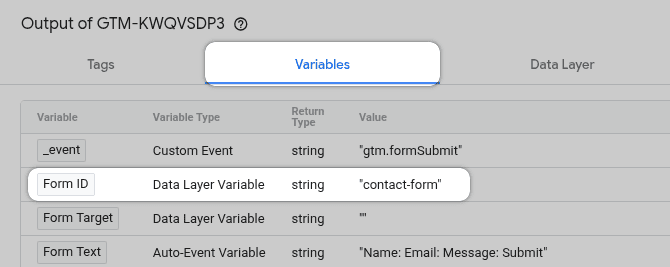
In this tutorial we'll use variable "Form ID" with the value contact-form.
Now that you've identified your form, let's make our trigger more specific so it only fires on that form.
Go back to the trigger you created in Step 2.
Change the setting from All Forms to Some Forms.
Set the condition to fire only when your form is detected. The most reliable method is using the Form ID. For example: Form ID equals contact-us-form
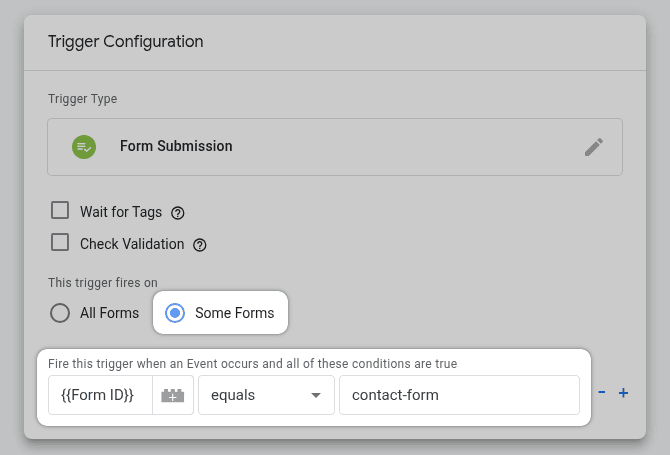
Change the name to be more specific and save your trigger.
Now we tell GTM what to do when the trigger fires. We'll create two tags: one for GA4 and one for Meta.
In your GTM workspace, go to "Tags" in the left-hand menu and click "New".
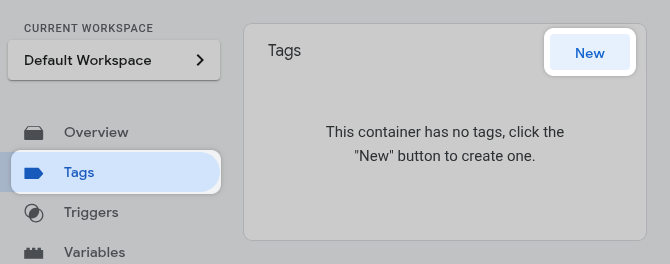
Give it a descriptive name (e.g., "GA4 - Event - generate_lead").
Next click "Tag Configuration".
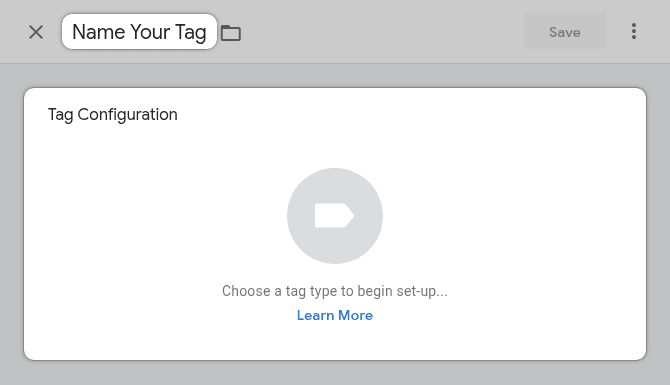
Click on "Google Analytics".

Next, select "Google Analytics: GA4 Event".

Enter "Measurement ID" of your GA4 property.
For the Event Name enter generate_lead. This is Google's recommended event name for lead form submissions.
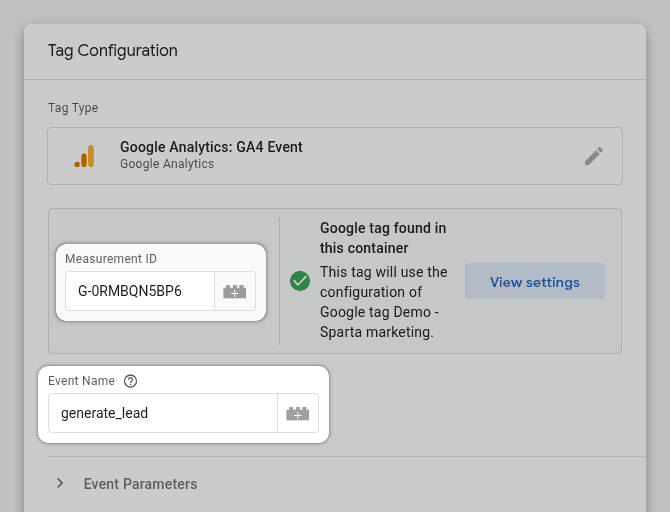
Set the trigger you've created earlier.
Save the tag.
In your GTM workspace, go to "Tags" in the left-hand menu and click "New".

Give it a descriptive name (e.g., "Meta - Event - Lead").
Next click "Tag Configuration".

Search for and select the "Facebook Pixel" tag template from the Community Template Gallery (if you haven't used it before, you'll need to add it to your workspace).
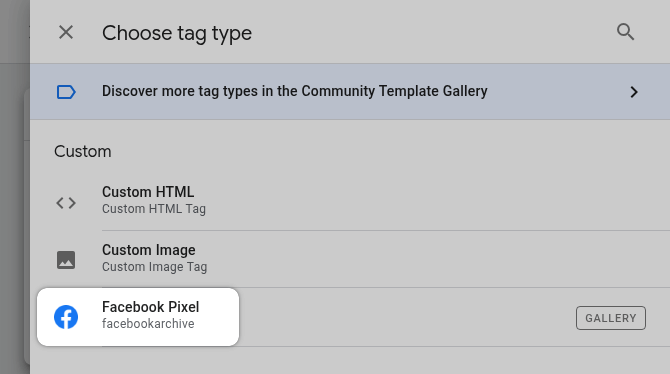
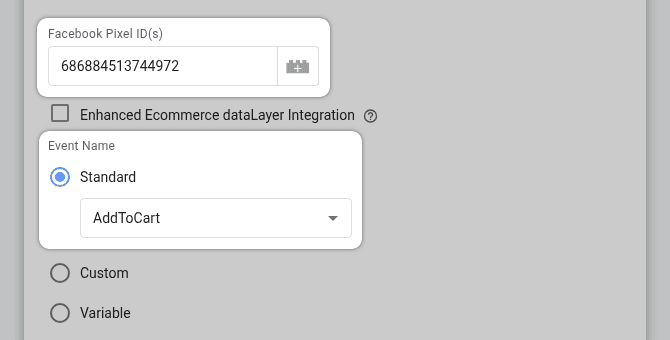
Enter your Meta Pixel ID into the "Facebook Pixel ID(s)".
Under the "Event Name" from the "Standard" dropdown, select Lead.
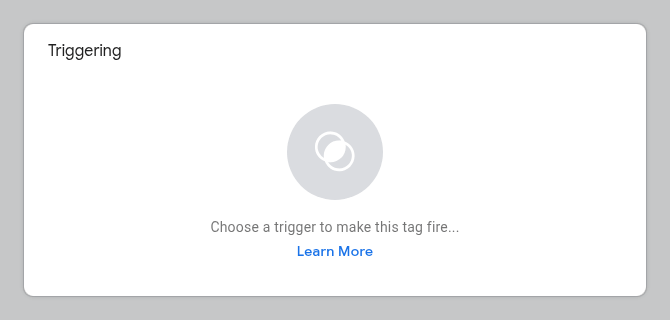
Click on the "Triggering" box below the tag configuration.
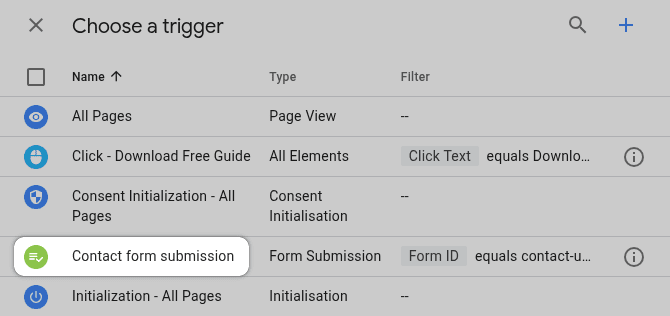
Select the refined trigger you made in Step 4.
Save the tag.
Enter the Preview again, and re-run your test.
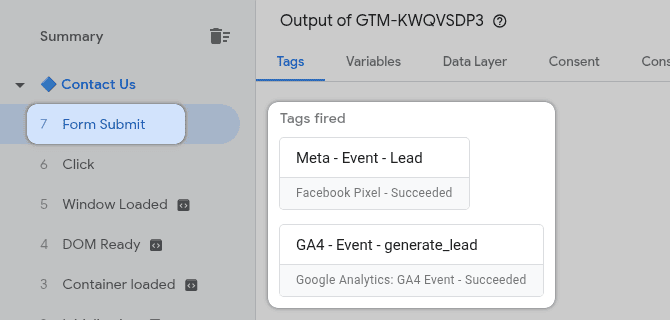
This time, when you see the Form Submit event, you should also see your GA4 - Event - generate_lead and Meta - Event - Lead tags listed under the "Tags Fired" section. You can also check the GA4 DebugView and Meta's Events Manager to see the events arrive in real-time.
What if you never saw the Form Submit event in Preview Mode back in Step 3? This usually means your form is not using standard <form> HTML element.
Your options become more complex:
- The Developer Route (Most Reliable): the best solution is to ask a developer to add a
dataLayer.pushto the form's success callback. They can push a custom event likedataLayer.push({'event': 'contact_form_success'});which you can then use to build a "Custom Event" trigger in GTM. - The DIY Click Trigger: You can create a trigger that fires on clicks of the submit button (
Click - All Elements, then filter by the button's Click ID or Click Classes). This is very brittle. if the button's code changes, your tracking will break. - The DIY Visibility Trigger: you can create a trigger that fires when the "Thank you" message appears on the screen (
Trigger Type: Element Visibility). This is also brittle and can easily break.
Method 2: The Simple & Reliable Solution with Branchside Forms
After navigating the complexities of Google Tag Manager, you might be thinking: "There has to be a better way".
You're right, there is.
What if you could skip the variables, triggers, tags, and constant debugging? What if your form tracking just... worked, right out of the box? This is precisely why we built Branchside — a form builder designed for marketers who need reliable data without the technical headache.
Branchside Forms have conversion tracking built-in from the ground up. Instead of trying to "listen" for a submission from the outside with complex GTM configurations, the form itself knows when it has been submitted successfully and can report that event directly to your marketing platforms.
Here's how it solves all the common problems we've discussed:
Because tracking is an integral part of the form, it doesn't matter if your form is embedded, uses AJAX, or doesn't have a "thank you" page. Branchside tracks the successful server response, not just the submission attempt. This solves the core problem of GTM firing on failed submissions and guarantees your data is accurate.
Forget creating separate tags for every platform. In Branchside, you simply select the platforms you want to send conversion events and event type based on the platform. For example, to track lead conversions, you simply select Google Analytics 4 and generate_lead as an event.
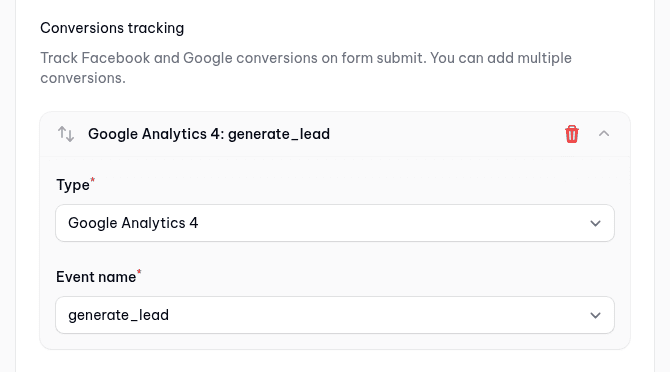
Want to send lead events to both GA4 and Meta? Simply add another conversion. In seconds, you can configure multiple events for multiple platforms, all from one simple menu.
With Branchside, you don't need to touch GTM for your form tracking. There are no dataLayer pushes to ask developers for, no brittle click triggers to maintain, and no Preview Mode debugging sessions. You build your form, enable conversions, and get back to what matters: growing your business with data you can trust.
Mastering form conversion tracking is the difference between guessing and knowing. Without reliable data, you can't properly optimize your campaigns, prove your ROI, or make informed decisions about your marketing budget.
As we've seen, you have two clear paths forward. The first is the manual, powerful-but-fragile path through Google Tag Manager. It gives you immense control but demands technical precision, constant testing, and a willingness to debug when things inevitably break.
The second is the automated, simple, and reliable path with a purpose-built tool like Branchside. It's designed to eliminate the complexity and give you what you've wanted all along: accurate conversion data, sent to all your marketing platforms, with minimal effort.
Ultimately, the goal is to get data you can trust. Whichever path you choose, you are now equipped with the knowledge to finally take control of your form tracking and start making data-driven decisions with confidence.
Ready to fix your form tracking for good?
Stop wrestling with GTM triggers and start getting reliable conversion data in minutes. Try Branchside Forms and see how simple your tracking can be.
Leave a comment
The email address you provide will not be published. It will be used to notify you of any replies.
